
![]()
Background: This tutorial does not use the NGSI-LD interface directly. it covers background information about IoT devices and protocols, which is then used in subsequent chapters.
Description: This tutorial is an introduction to IoT devices and the usage of the JSON Protocol for constrained devices. The tutorial introduces a series of dummy agricultural IoT devices which are displayed within the browser and allows a user to interact with them. A complete understanding of all the terms and concepts defined in this tutorial is necessary before proceeding to connect the IoT devices to an NGSI-LD context broker via a real IoT Agent.
The tutorial uses cUrl commands throughout, but is also available as Postman documentation

![]()
What are IoT devices?
"A farm is a manipulative creature. There is no such thing as finished. Work comes in a stream and has no end. There are only the things that must be done now and things that can be done later..."
— Kristin Kimball, The Dirty Life: On Farming, Food, and Love
The Internet of Things (IoT) is a network of physical devices which are able to connect to a network and exchange data. Each "thing" or "smart device" is a gadget with embedded electronics and software which can act as a sensor or actuator. Sensors are able to report the state of the real-world around them. Actuators are responsible for altering the state of the system, by responding to a control signal.
Each device is uniquely identifiable through its embedded computing system but is able to interoperate within the existing internet infrastructure.
FIWARE is a system for managing context information. For a smart solution based on the internet of Things, the context is provided by the array of attached IoT devices. Since each IoT device is a physical object which exists in the real world, it will eventually be represented as a unique entity within the context.
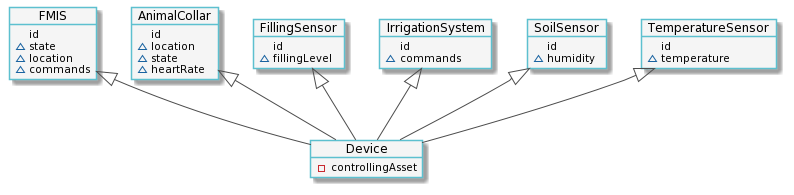
IoT devices can range from simple to complex. Here are some examples of agricultural IoT devices which will be used within this tutorial:
- A Soil Sensor can report on the amount of moisture in the ground.
- A Temperature Sensor can be queried to return current air or soil temperature.
- A Filling Sensor can report the amount of feed left in a silo.
- An Irrigation System can be sent a command to activate and turn on for a short period.
- Animal Collars can be used to track the location, health and stress-levels of livestock.
- Farm Management Information Systems placed in agricultural machinery can be used send and receive instructions to labourers, track the state of tasks and follow the progress of them.
As you can see, the Irrigation System is an example of a pure actuator, as it only reacts to the given commands. Meanwhile, the Soil Sensor is an example of a pure sensor, since it will only report on the state of the world as it sees it. Some devices such as an FMIS System are able to both respond to commands and report on state in a meaningful way.
The state information held within each device, as it will eventually be seen within the Context Broker is defined in the diagram below:
What is JSON?
JSON is a
lightweight text based protocol for constrained devices and communications where bandwidth and device memory resources
are limited. The payload for measurement requests is a list of key-value pairs separated by the pipe | character.
e.g.
{"<key>":"<value>", "<key>":"<value>", "<key>":"<value>"}.
For example a payload such as:
{"t":15,"k":"abc"}
Contains two attributes, one named "t" with value "15" and another named "k" with value "abc" are transmitted. Values in JSON are not typed (everything is treated as a string).
JSON defines a payload describing measures and commands to share between devices and servers but, does not specify a single transport protocol. Instead, different transport protocol bindings (such as HTTP, MQTT and AMQP) can be used for different scenarios. For this tutorial we will be using HTTP as a transport protocol.
Southbound Traffic (Commands)
HTTP requests generated by the from the Context Broker and passed downwards towards an IoT device (via an IoT agent) are
known as southbound traffic. Southbound traffic consists of commands made to actuator devices which alter the state
of the real world by their actions. For example a command to alter the state of a lamp to ON would switch on the lamp
in real life. This in turn could alter the readings of other sensors nearby.
Push Command using HTTP POST
Setting up the southbound communication between an IoT Agent and IoT devices is known as provisioning. This ensuress that the IoT Agent holds sufficient information to be able to contact each IoT device. In other words it knows where to send commands and which commands are supported. In order to send a command to a device, the IoT Agent sends a POST request to the endpoint supplied by the device. The body of the POST request holds the command.
The payload for JSON commands has the following format:
<device name>@<command>|<param|<param>
Where <device_name> is the entity id as held in the context broker, <command> is one of the supported commands and
any additional required values are passed in subsequent parameters for example:
{"urn:ngsi-ld:Robot:001": {"turn": "left"}}
Will tell a device "I am known as id="urn:ngsi-ld:Robot:001" within the Context Broker. I would like the device
listening on this endpoint to perform the turn command. I have supplied the parameters left and '30 (degrees) as
required for the device to be able to perform the maneuver".
The defined Northbound response to an IoT Agent is as follows:
{"urn:ngsi-ld:Robot:001": {"turn": "Turn ok"}}
Which is saying "I have complied with a request from the entity known as id="urn:ngsi-ld:Robot:001" within the
Context Broker. The command I have performed was a turn command. The result was Turn ok".
As you can see, because the Southbound command defines the id used within the interaction, and the same data is also
returned, every response can always be associated to the appropriate entity held within the Context Broker.
Push commands can only be used if the device is able to supply a separate endpoint for listening to southbound traffic, an alternative polling mechanism can be used when all interactions are initiated from the device itself, but this is beyond the scope of this tutorial.
Northbound Traffic (Measurements)
Requests generated from an IoT device and passed back upwards towards the Context Broker (via an IoT agent) are known as northbound traffic. Northbound traffic consists of measurements made by sensor devices and relays the state of the real world into the context data of the system. For example a measurement from a humidity sensor could be relayed back into the context broker to indicate that the moisture level of the entity has changed. A subscription could be made to be informed of such changes and there provoke further actions (such as turning on a sprinkler).
Measurement using HTTP GET
A device can report new measures to an IoT Agent using an HTTP GET request to a "well-known" endpoint (the path
/iot/d) along with the following query parameters:
i(device ID): Device ID (unique for the API Key).k(API Key): API Key for the service the device is registered on.t(timestamp): Timestamp of the measure. Will override the automatic IoTAgent timestamp (optional).d(Data): JSON payload.
The i and k parameters are mandatory.
For example the request:
<iot-agent>/iot/d?i=humidity001&k=<api-key>&d=h|12
Would indicate that the device id=humidity001 wishes to inform the IoT Agent that is has made a real-world measurement
h with the value 12. This would eventually be passed up into the Context Broker.
Measurement using HTTP POST
HTTP POST can also be used. Again the path will be /iot/d, but in this case, d (Data) is not necessary - the
key-value pairs of the measurement are passed as the body of the request. i and k query parameters are still
mandatory:
i(device ID): Device ID (unique for the API Key).k(API Key): API Key for the service the device is registered on.t(timestamp): Timestamp of the measure. Will override the automatic IoTAgent timestamp (optional).
Once again the i and k parameters are mandatory.
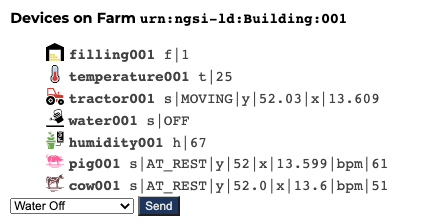
Device Monitor
For the purpose of this tutorial, a series of dummy IoT devices have been created, which will eventually be attached to
the context broker. The state of each device can be seen on the JSON device monitor web page found at
http://localhost:3000/device/monitor:
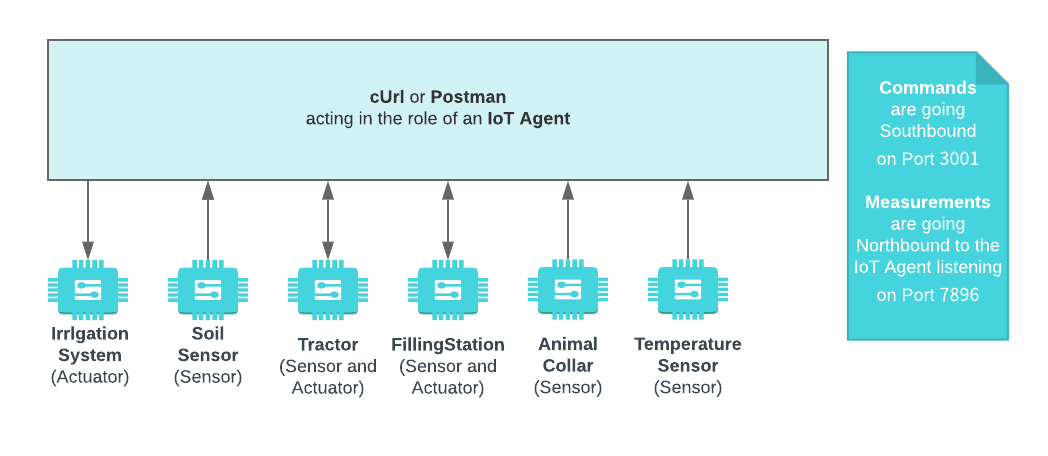
Architecture
The demo application will only make use of a single custom component acting as a set of dummy IoT devices. Every IoT device will be using the JSON protocol running over HTTP. Since all interactions are initiated by HTTP requests, the entities can be containerized and run from exposed ports.
The necessary configuration information can be seen in the services section of the associated docker-compose.yml file:
Tutorial Configuration
tutorial:
    image: quay.io/fiware/tutorials.ngsi-ld
    hostname: iot-sensors
    container_name: fiware-tutorial
    networks:
        - default
    expose:
        - "3000"
        - "3001"
    ports:
        - "3000:3000"
        - "3001:3001"
    environment:
        - "DEBUG=tutorial:*"
        - "PORT=3000"
        - "IOTA_HTTP_HOST=iot-agent"
        - "IOTA_HTTP_PORT=7896"
        - "DUMMY_DEVICES_PORT=3001"
        - "DUMMY_DEVICES_API_KEY=4jggokgpepnvsb2uv4s40d59ov"
The tutorial container is listening on two ports:
- Port
3000is exposed so we can see the web page displaying the Dummy IoT devices. - Port
3001is exposed purely for tutorial access - so that cUrl or Postman can make JSON commands without being part of the same network.
The tutorial container is driven by environment variables as shown:
| Key | Value | Description |
|---|---|---|
| DEBUG | tutorial:* |
Debug flag used for logging |
| WEB_APP_PORT | 3000 |
Port used by web-app which displays the dummy device data |
| IOTA_HTTP_HOST | iot-agent |
The hostname of the missing IoT Agent - used in a later tutorial |
| IOTA_HTTP_PORT | 7896 |
The port that the missing IoT Agent will be listening on. 7896 is a common default for JSON over HTTP |
| DUMMY_DEVICES_PORT | 3001 |
Port used by the dummy IoT devices to receive commands |
| DUMMY_DEVICES_API_KEY | 4jggokgpepnvsb2uv4s40d59ov |
Random security key used for JSON interactions - this will be used in a later tutorial to ensure the integrity of interactions between the devices and the missing IoT Agent |
The other tutorial container configuration values described in the YAML file are not used in this tutorial.
When describing the messages being passed through a working smart solution we will refer to two further components which are not used in this tutorial, but will be needed to complete the system subsequently.
- The Orion Context Broker is used for holding the context data of the smart solution. As you know all interactions with the context broker must be made using NGSI-LD.
- An IoT Agent acts as a middleware component converting NGSI-LD requests (from the context broker) into a protocol (such as JSON) usable by the IoT devices themselves.
It is therefore necessary to understand a sample device protocol first, and fully comprehend how messages are passed through the system to subsequently understand the purpose of the IoT Agent middleware. In this tutorial you will be playing the role of an IoT Agent making commands to devices and receiving measurements from them.
Start Up
All services can be initialized from the command-line by running the bash script provided within the repository. Please clone the repository and create the necessary images by running the commands as shown:
#!/bin/bash
git clone https://github.com/FIWARE/tutorials.IoT-Sensors.git
cd tutorials.IoT-Sensors
git checkout NGSI-LD

./services [orion|scorpio|stellio]
This command will also import seed data from the previous Farm Management example on startup.
Note: If you want to clean up and start over again you can do so with the following command:
./services stop
Communicating with IoT Devices
To follow the tutorial correctly please ensure you have the device monitor page available in your browser and click on the page to enable audio before you enter any cUrl commands. The device monitor displays the current state of an array of dummy devices using JSON syntax.
Device Monitor
The device monitor can be found at: http://localhost:3000/device/monitor
Within this tutorial you will be playing the role of the missing IoT Agent component, making Southbound commands to the attached IoT devices and receiving Northbound measurements as the environment changes within the store. All the commands are made as HTTP POST requests using JSON syntax and therefore are very simple. It is worthwhile keeping an eye on the device monitor page as it shows all the Northbound traffic generated by the devices themselves.
Irrigation System Commands
An Irrigation System water sprinkler is an example of an actuator. It can respond to commands, but the device does not supply any measurements from the real world.
Turn on the Irrigation System
This example shows how a real IoT Agent would send commands to an actuator. The Irrigation System has supplied an
endpoint /iot/water001 where it is listening for commands.
1 Request:
curl -iX POST 'localhost:3001/iot/water001' \
-H 'Content-Type: text/plain' \
--data-raw 'urn:ngsi-ld:Device:water001@on'
Response:
urn:ngsi-ld:Device:water001@on| on OK
The body of the request is in JSON syntax and consists of the id of the device (urn:ngsi-ld:Device:water001) as held
in the Context Broker and the name of the command (on) to invoke on the device.
The response returns the command and the result of the action.
If you are viewing the device monitor page, you can see the state of the water sprinkler change.

Turn off the Irrigation System
This example shows how to turn off the irrigation system. In this case, the device is also listening for multiple commands off a single endpoint and interpreting the payload body.
2 Request:
curl -L -X POST 'localhost:3001/iot/water001' \
-H 'Content-Type: text/plain' \
--data-raw 'urn:ngsi-ld:Device:water001@off'
Response:
urn:ngsi-ld:Device:water001@off| off OK
Tractor Commands
Using the simple FMIS system found within a Tractor can send tasks to the operator of the tractor - it can also report on the location and status of the vehicle.
Measurements will be returned to the IoT Agent as the state of work and location changes.
FMIS System Commands
An FMIS System on the dashboard of a tractor is an example of a combined actuator and sensor.
Activate a Tractor
This example shows how a real IoT Agent would send an JSON command to a Tractor FMIS System to move it from an idle
to an active state. The unit with the Tractor itself has already supplied an endpoint /iot/tractor001 where it is
listening for commands.
3 Request:
curl -iX POST \
  --url 'http://localhost:3001/iot/tractor001' \
  --data urn:ngsi-ld:Device:tractor001@start
The body of the request consists of the id of the device (urn:ngsi-ld:Device:tractor001) as held in the Context
Broker and the name of the command (start) to invoke on the device.
Response:
The response returns the command and the result of the action.
urn:ngsi-ld:Device:tractor001@start| start OK
Once the tractor is activated, the location and activity of the tractor will alter dependent upon whether the internal GPS detects movement. The measurement is actively reported and requests to the IoT Broker can be seen on the device monitor page.
Deactivate a Tractor
This example shows how a real IoT Agent would send an JSON command to a Tractor FMIS System to return the vehicle to
an idle state. The Tractor has already supplied an endpoint /iot/tractor001 where it is listening for commands.
4 Request:
curl -iX POST \
  --url 'http://localhost:3001/iot/tractor001' \
  --data urn:ngsi-ld:Device:tractor001@stop
The body of the request consists of the id of the device (urn:ngsi-ld:Device:tractor001) as held in the Context
Broker and the name of the command (stop) to invoke on the device.
Response:
The response returns the command and the result of the action.
urn:ngsi-ld:Device:tractor001@stop| stop OK
Once the lamp is switched off the gps location does not alter. The latest JSON measurement (s|IDLE|gps|13.36,52.515)
as sent to the IoT Broker can be seen on the device monitor page.
To turn the Tractor back on again repeat the following command:
5 Request:
curl -iX POST \
  --url 'http://localhost:3001/iot/tractor001' \
  --data urn:ngsi-ld:Device:tractor001@start
Response:
urn:ngsi-ld:Device:tractor001@start| start OK
Filling Station Commands
The Filling Station is an electronic device which can be sent a command to request that feed is added or removed from the silo. It can also report on its load level. In reality such a device would be connected to the FMIS System to request that a worker fills the silo when it gets too low, but in this case we are treating the device as both a sensor and actuator.
Measurements will be sent to the IoT Agent as the state changes.
Remove Hay from the Barn
This example shows how a real IoT Agent would send an JSON command to a Filling Station to unload the barn. The
Filling Station has already supplied an endpoint /iot/filling001 where it is listening for commands.
6 Request:
curl -iX POST \
  --url 'http://localhost:3001/iot/filling001' \
  --data urn:ngsi-ld:Device:filling001@remove
The body of the request consists of the id of the device (urn:ngsi-ld:Device:filling001) as held in the Context
Broker and the name of the command (remove) to invoke on the device.
Response:
The response returns the command and the result of the action.
urn:ngsi-ld:Device:filling001@remove| remove OK
Once the command is sent, some time will pass and the level of the filling station will change. The changes of state are actively reported to the IoT Broker when they occur, and the updated state of the FillingStation can be seen on the device monitor page.
The SoilSensor, AnimalCollars and TemperatureSensors found on the farm are not actuators since they do not respond to commands, however they do actively monitor and measures the state of things in the real world. If any of the other commands have been sent, the various dummy sensors will also start to respond.
The Northbound HTTP requests generated by the sensors can be also viewed on the device monitor page.

Sending Measures
This example simulates a request coming from the device humidity001.
The request to the previously provisioned resource iot/d is in JSON format and identifies the device humidity and
passes a known API key.
7 Request:
curl -L -X POST \
  'http://localhost:7896/iot/d?k=4jggokgpepnvsb2uv4s40d59ov&i=humidity001' \
-H 'Content-Type: text/plain' \
--data-raw 'h|20'
Response:
The example as written will not work unless the IoT Agent exists and is listening on the appropriate endpoint (/iot/d)
to process the measure. However, this measure is the class of request generated by all JSON. sensors.