

Description: This tutorial uses Apache APISIX as an API Gateway Policy Enforcement Point (PEP) combined with Keycloak to secure access to endpoints exposed by FIWARE generic enablers. Users (or other actors) must log in and present a valid JWT to gain access to services. The application code created in the previous tutorial is expanded to enforce Role-Based Access Control (RBAC) at the gateway level throughout a distributed system. The APISIX route configuration and Keycloak realm setup are described in detail.
cUrl commands are used throughout to access the Keycloak and APISIX REST APIs - Postman documentation for these calls is also available.


PEP Proxy
"Good fences make good neighbors."
— Robert Frost
The previous tutorial demonstrated that it is possible to Permit or Deny access to resources based
on an authenticated user identifying themselves within an application. It was simply a matter of the code following a
different line of execution if the access_token was not found (Level 1 - Authentication Access), or confirming that
a given access_token had appropriate rights (Level 2 - Basic Authorization). The same method of securing access can
be applied by placing a Policy Enforcement Point (PEP) in front of other services within a FIWARE-based Smart Solution.
A PEP Proxy lies in front of a secured resource and is an endpoint found at "well-known" public location. It serves as a gatekeeper for resource access. Users or other actors must supply sufficient information to the PEP Proxy to allow their request to succeed and pass through the PEP proxy. The PEP proxy then passes the request on to the real location of the secured resource itself - the actual location of the secured resource is unknown to the outside user - it could be held in a private network behind the PEP proxy or found on a different machine altogether.
Apache APISIX is a high-performance, cloud-native API Gateway. Combined with Keycloak,
APISIX acts as a full Policy Enforcement Point (PEP): it validates JWTs using the openid-connect plugin and enforces
Role-Based Access Control using the authz-keycloak plugin. Whenever a user tries to gain access to a resource behind
the gateway, APISIX validates the token, evaluates the user's roles against the Keycloak authorization policy, and
either permits or denies the request. Authorized users receive the same response as if they had accessed the secured
service directly. Unauthorized users receive a 401 Unauthorized or 403 Forbidden response.
Standard Concepts of Identity Management
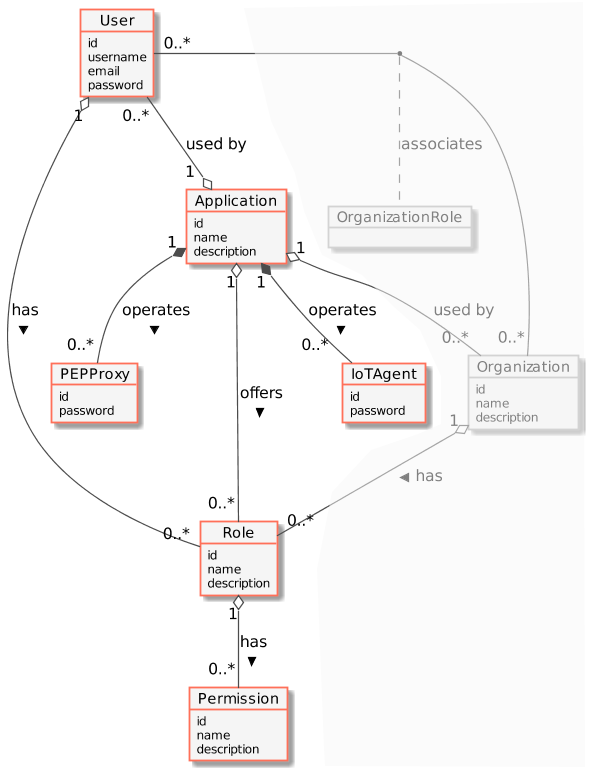
The following common objects are found with the Keycloak Identity Management database:
- User - Any signed up user able to identify themselves with an eMail and password. Users can be assigned rights individually or as a group
- Application - Any securable FIWARE application consisting of a series of microservices
- Organization - A group of users who can be assigned a series of rights. Altering the rights of the organization effects the access of all users of that organization
- OrganizationRole - Users can either be members or admins of an organization - Admins are able to add and remove users from their organization, members merely gain the roles and permissions of an organization. This allows each organization to be responsible for their members and removes the need for a super-admin to administer all rights
- Role - A role is a descriptive bucket for a set of permissions. A role can be assigned to either a single user or an organization. A signed-in user gains all the permissions from all of their own roles plus all of the roles associated to their organization
- Permission - An ability to do something on a resource within the system
Additionally two further non-human application objects can be secured within a FIWARE application:
- IoTAgent - a proxy between IoT Sensors and the Context Broker
- Service Account - a non-human client identity within Keycloak, used by the IoT Agent to authenticate with the
Context Broker via the
client_credentialsgrant.
The relationship between the objects can be seen below - the entities marked in red are used directly within this tutorial:
Video: Introduction to API Gateway Security

Click on the image above to see an introductory video about securing FIWARE microservices with an API Gateway
Prerequisites
Docker
To keep things simple both components will be run using Docker. Docker is a container technology which allows to different components isolated into their respective environments.
- To install Docker on Windows follow the instructions here
- To install Docker on Mac follow the instructions here
- To install Docker on Linux follow the instructions here
Docker Compose is a tool for defining and running multi-container Docker applications. A YAML file is used configure the required services for the application. This means all container services can be brought up in a single command. Docker Compose is installed by default as part of Docker for Windows and Docker for Mac, however Linux users will need to follow the instructions found here
Cygwin
We will start up our services using a simple bash script. Windows users should download cygwin to provide a command-line functionality similar to a Linux distribution on Windows.
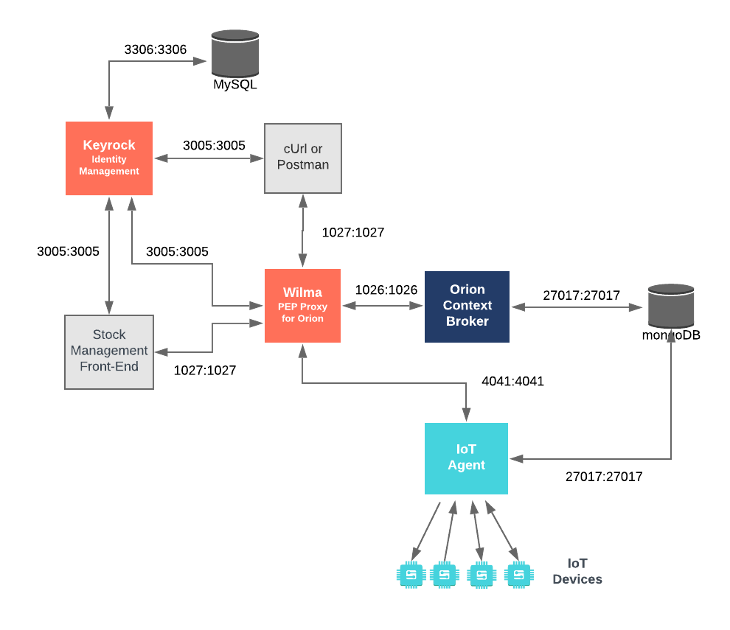
This application protects access to the existing Farm Management and Sensors-based application by placing Apache APISIX as an API Gateway in front of the services created in previous tutorials. User and realm data is pre-populated into the PostgreSQL database used by Keycloak on start-up. The tutorial makes use of four FIWARE components — the Orion-LD Context Broker, the IoT Agent for JSON, Keycloak as the Identity and Access Management server, and Apache APISIX as the API Gateway / Policy Enforcement Point. Usage of the Orion-LD Context Broker is sufficient for an application to qualify as "Powered by FIWARE".
Both the Orion-LD Context Broker and the IoT Agent rely on open source MongoDB technology to keep persistence of the information they hold. We will also be using the dummy IoT devices created in the previous tutorial. Keycloak uses its own PostgreSQL database.
Therefore the overall architecture will consist of the following elements:
- The FIWARE Orion-LD Context Broker which will receive requests using NGSI-LD
- The FIWARE IoT Agent for JSON which will receive southbound requests using NGSI-LD and convert them to JSON commands for the devices
- Keycloak Identity and Access Management offering:
- An OAuth2 / OIDC authentication system for Applications and Users
- A graphical frontend for Identity Management Administration
- A REST API for Identity Management via HTTP requests
- Apache APISIX acting as an API Gateway and Policy Enforcement Point:
- Validates JWT Bearer tokens on every request using the
openid-connectplugin - Enforces Keycloak RBAC / UMA policies using the
authz-keycloakplugin on user-facing routes - Routes IoT Agent northbound traffic (
/data/orion/*,/data/scorpio/*,/data/stellio/*) using JWT-only validation
- Validates JWT Bearer tokens on every request using the
- The underlying MongoDB database :
- Used by the Orion-LD Context Broker to hold context data information such as data entities, subscriptions and registrations
- Used by the IoT Agent to hold device information such as device URLs and Keys
- A PostgreSQL database :
- Used by Keycloak to persist user identities, applications, roles and permissions
- The Farm Management Frontend does the following:
- Displays farm building and sensor information
- Shows which animals and equipment are present
- Allows authorized users to send commands to IoT devices
- Allows authorized users into restricted areas
- A webserver acting as set of dummy IoT devices using the JSON protocol running over HTTP — access to certain resources is restricted.
Since all interactions between the elements are initiated by HTTP requests, the entities can be containerized and run from exposed ports.
The specific architecture of each section of the tutorial is discussed below.
Start Up
To start the installation, do the following:
git clone https://github.com/FIWARE/tutorials.PEP-Proxy.git
cd tutorials.PEP-Proxy
git checkout NGSI-LD

./services create
Note The initial creation of Docker images can take up to three minutes
Thereafter, all services can be initialized from the command-line by running the services Bash script provided within the
./services <command>
Where <command> will vary depending upon the exercise we wish to activate.
:information_source: Note: If you want to clean up and start over again you can do so with the following command:
console
./services stop
Dramatis Personae
The following people at fiware.farm legitimately have accounts within the Farm Management Information System:
- Bob, the Farm Manager - he has full control over the farm and all entities.
- Carol, a Livestock Supervisor - she manages animals and related sensors (water, filling levels).
- Jenny, a Read-Only Consultant - an external auditor who can view all farm data but cannot make changes.
- Alice, the System Administrator - she manages the Keycloak instance but does not have direct access to farm data by default.
The following person at fiware.farm has signed up for an account but has no reason to be granted access:
- Mallory, the Malicious Attacker - she should be denied access to all farm resources.
1. Defined Roles & Capabilities
The following roles are defined within the farm-management realm:
| Role | Description | Access Level |
|---|---|---|
farm-manager |
Full control over the farm. | Read & Write (All Entities) |
livestock-supervisor |
Manages animals and related sensors. | Read & Write (Animal, Water, etc.) |
read-only-consultant |
External auditor/viewer. | Read Only (All Entities) |
crop-supervisor |
Manages fields and weather data. | Read & Write (Fields, Soil) |
equipment-supervisor |
Manages tractors and machinery. | Read & Write (Tractors) |
field-worker |
Worker on the ground. | Read (Domain), Write (Measurements) |
2. User Assignments (Initial Setup)
For the purpose of this tutorial, the following users have been provisioned with the credentials below (password is
always test):
| User | Group | Assigned Role | Effective Rights |
|---|---|---|---|
| Bob | farm-management |
farm-manager |
Full Read/Write access to all entities. |
| Carol | livestock-team |
None (Directly) | Access Denied (No role mapping for group) |
| Jenny | external-consultants |
None (Directly) | Access Denied (No role mapping for group) |
| Alice | None | None | Access Denied (No roles assigned) |
| Mallory | None | None | Access Denied (No roles assigned) |
[!NOTE] In the initial setup, Bob is the only user with functional access to the data because he is the only one explicitly assigned a role (
farm-manager). For Carol or Jenny to have access, their respective groups would need to be mapped to thelivestock-supervisororread-only-consultantroles within Keycloak.
One application (ngsi-ld-farm), with appropriate roles and permissions has also been created:
| Key | Value |
|---|---|
| Client ID | ngsi-ld-farm |
| Client Secret | 1234 |
| URL | http://localhost:3000 |
| RedirectURL | http://localhost:3000/login |
To save time, the data creating users and roles from the previous tutorial has been imported and is automatically persisted to the PostgreSQL database on start-up so the assigned UUIDs do not change and the data does not need to be entered again.
The Keycloak PostgreSQL database deals with all aspects of application security including storing users, passwords etc.; defining access rights and dealing with OAuth2 / OIDC authorization protocols.
To refresh your memory about how to create users, groups and clients, you can log in to the Keycloak Admin Console at
http://localhost:3005 using the account alice with a password of test.
and look around.
Logging In to Keycloak using the REST API
The Keycloak token endpoint follows the standard OAuth2 pattern. The base URL exposed externally is
http://localhost:3005/realms/farm-management/protocol/openid-connect/token.
Create Token with Password
The following example logs in as Bob the Farm Manager using the User Credentials (password) grant:
:one: Request:
curl -iX POST \
  'http://localhost:3005/realms/farm-management/protocol/openid-connect/token' \
  -H 'Content-Type: application/x-www-form-urlencoded' \
  --data 'username=bob&password=test&grant_type=password&client_id=ngsi-ld-farm&client_secret=1234&scope=openid+profile+email'
Response:
The response returns an access_token (JWT) and a refresh_token:
{
    "access_token": "eyJhbGciOiJSUzI1NiIsInR5cCI6IkpXVCIsImtpZCI6Ii4uLiJ9...",
    "expires_in": 300,
    "refresh_expires_in": 1800,
    "refresh_token": "eyJhbGciOiJIUzUxMiIsInR5cCIgOiAiSldUIiwia2lkIiA6Ii4uLiJ9...",
    "token_type": "Bearer",
    "id_token": "eyJhbGciOiJSUzI1NiIsInR5cCIgOiAiSldUIiwia2lkIiA6Ii4uLiJ9...",
    "scope": "openid profile email"
}
Get Token Info
The access_token is a signed JWT. User details and realm roles can be retrieved from the Keycloak /userinfo endpoint
using the token:
:two: Request:
curl -X GET \
  'http://localhost:3005/realms/farm-management/protocol/openid-connect/userinfo' \
  -H 'Authorization: Bearer <access_token>'
Response:
{
    "sub": "bbbbbbbb-good-0000-0000-000000000000",
    "email_verified": true,
    "name": "Bob Manager",
    "preferred_username": "bob",
    "given_name": "Bob",
    "family_name": "Manager",
    "email": "bob@fiware.farm",
    "realm_access": {
        "roles": ["farm-manager"]
    }
}
Configuring the APISIX Gateway
Unlike Keyrock-based PEP Proxies (Wilma) which are separate running containers managed via a REST API, APISIX is
configured declaratively through a YAML file (apisix-config/apisix.yaml) that is loaded at startup and
hot-reloaded on change. There is no imperative CRUD API — routes, upstreams, and plugins are all defined as code.
APISIX Route Configuration
The gateway configuration is split into two categories of routes:
User-facing routes (/orion/*, /scorpio/*, /stellio/*) — these apply both JWT validation (openid-connect
plugin in bearer-only mode) and Keycloak UMA RBAC enforcement (authz-keycloak plugin):
- id: 1
  uri: /orion/*
  upstream_id: 1
  plugins:
      proxy-rewrite:
          regex_uri: ["^/orion(.*)", "$1"]
      openid-connect:
          client_id: "ngsi-ld-farm"
          client_secret: "1234"
          discovery: "http://keycloak:8080/realms/farm-management/.well-known/openid-configuration"
          bearer_only: true
      authz-keycloak:
          discovery: "http://keycloak:8080/realms/farm-management/.well-known/uma2-configuration"
          client_id: "ngsi-ld-farm"
          client_secret: "1234"
          permissions: ["Entity Collection"]
          http_method_as_scope: true
          policy_enforcement_mode: "ENFORCING"
          ssl_verify: false
IoT Agent data routes (/data/orion/*, /data/scorpio/*, /data/stellio/*) — these apply JWT validation only (no
UMA round-trip on every high-frequency device write):
- id: 4
  uri: /data/orion/*
  upstream_id: 1
  plugins:
      proxy-rewrite:
          regex_uri: ["^/data/orion(.*)", "$1"]
      openid-connect:
          client_id: "ngsi-ld-farm"
          client_secret: "1234"
          discovery: "http://keycloak:8080/realms/farm-management/.well-known/openid-configuration"
          bearer_only: true
The relevant APISIX configuration keys for the openid-connect plugin are:
| Key | Value | Description |
|---|---|---|
client_id |
ngsi-ld-farm |
The Keycloak client used to introspect / validate tokens |
client_secret |
1234 |
The client secret |
discovery |
http://keycloak:8080/realms/farm-management/.well-known/openid-configuration |
OIDC discovery URL — APISIX fetches JWKs automatically |
bearer_only |
true |
Only validate tokens; never redirect to login page |
For the authz-keycloak plugin:
| Key | Value | Description |
|---|---|---|
permissions |
["Entity Collection"] |
The Keycloak resource name that must be accessible |
http_method_as_scope |
true |
Maps HTTP verb (GET/PATCH/DELETE) to Keycloak scope |
policy_enforcement_mode |
ENFORCING |
Deny by default if no matching policy is found |
APISIX - Start Up
To start the system run the following command:
./services orion
This will start up Keycloak, APISIX, Orion-LD, the IoT Agent and supporting services. The APISIX gateway
routes are loaded from apisix-config/apisix.yaml automatically.
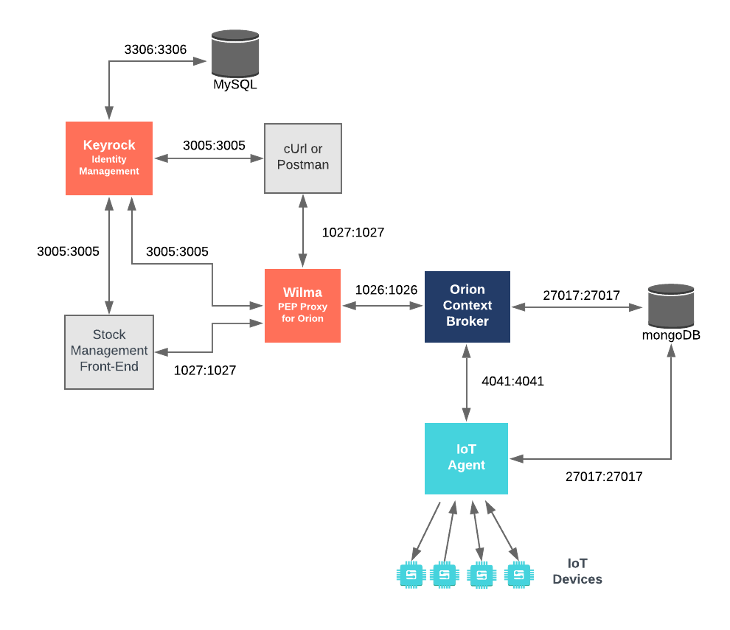
Securing the Orion-LD Context Broker
APISIX Configuration
APISIX is the single entry point for all requests to the Context Broker. There is no separate proxy container to deploy
— the apisix service defined in docker-compose/common.yml handles all routing based on the declarative YAML
configuration. The relevant upstream for Orion-LD is:
upstreams:
    - id: 1
      nodes:
          orion:1026: 1
      type: roundrobin
And the corresponding user-facing route for Orion-LD requests:
routes:
    - id: 1
      uri: /orion/*
      upstream_id: 1
      plugins:
          proxy-rewrite:
              regex_uri: ["^/orion(.*)", "$1"]
          openid-connect:
              client_id: "ngsi-ld-farm"
              client_secret: "1234"
              discovery: "http://keycloak:8080/realms/farm-management/.well-known/openid-configuration"
              bearer_only: true
          authz-keycloak:
              discovery: "http://keycloak:8080/realms/farm-management/.well-known/uma2-configuration"
              client_id: "ngsi-ld-farm"
              client_secret: "1234"
              permissions: ["Entity Collection"]
              http_method_as_scope: true
              policy_enforcement_mode: "ENFORCING"
              ssl_verify: false
APISIX is exposed on port 9080 (HTTP). All Orion-LD requests are sent to http://localhost:9080/orion/... and APISIX
strips the /orion prefix before forwarding to the upstream orion:1026.
| Key | Value | Description |
|---|---|---|
uri |
/orion/* |
The path prefix matched by this route |
upstream |
orion:1026 |
The Context Broker upstream |
openid-connect.bearer_only |
true |
Validate JWT only — never redirect to Keycloak login |
openid-connect.discovery |
http://keycloak:8080/realms/farm-management/.well-known/openid-configuration |
Keycloak OIDC discovery for JWK validation |
authz-keycloak.permissions |
["Entity Collection"] |
The Keycloak resource a caller must have access to |
authz-keycloak.http_method_as_scope |
true |
GET → read scope, PATCH/DELETE → write scope |
For this tutorial, the gateway enforces both Level 1 Authentication Access (valid JWT) and Level 2 RBAC Authorization (Keycloak role policy) on user-facing Orion-LD routes.
Application Configuration
The tutorial application has already been registered in Keycloak as the ngsi-ld-farm client. Programmatically, the
tutorial application makes requests to APISIX in front of the Orion-LD Context Broker. Every request must
include an Authorization: Bearer <JWT> header.
tutorial-app:
    image: fiware/tutorials.context-provider
    hostname: tutorial-app
    container_name: tutorial-app
    depends_on:
        - apisix
        - iot-agent
        - keycloak
    networks:
        default:
            ipv4_address: 172.18.1.7
            aliases:
                - iot-sensors
    expose:
        - "3000"
        - "3001"
    ports:
        - "3000:3000"
        - "3001:3001"
    environment:
        - "WEB_APP_PORT=3000"
        - "SECURE_ENDPOINTS=true"
        - "CONTEXT_BROKER=http://apisix:9080/orion"
        - "KEYCLOAK_URL=http://localhost"
        - "KEYCLOAK_IP_ADDRESS=http://172.18.1.5"
        - "KEYCLOAK_PORT=3005"
        - "KEYCLOAK_CLIENT_ID=ngsi-ld-farm"
        - "KEYCLOAK_CLIENT_SECRET=1234"
        - "CALLBACK_URL=http://localhost:3000/login"
All context broker traffic is now sent to apisix on port 9080 under the /orion prefix, rather than directly to
orion on port 1026 as in previous tutorials. The relevant settings are:
| Key | Value | Description |
|---|---|---|
WEB_APP_PORT |
3000 |
Port used by web-app which displays the login screen & etc. |
CONTEXT_BROKER |
http://apisix:9080/orion |
All Context Broker traffic is routed through APISIX |
KEYCLOAK_URL |
http://localhost |
This is URL of the Keycloak Web frontend itself, used for redirection when forwarding users |
KEYCLOAK_IP_ADDRESS |
http://172.18.1.5 |
This is URL of the Keycloak OAuth Communications |
KEYCLOAK_PORT |
3005 |
This is the port that Keycloak is listening on. |
KEYCLOAK_CLIENT_ID |
ngsi-ld-farm |
The Client ID defined by Keycloak for this application |
KEYCLOAK_CLIENT_SECRET |
1234 |
The Client Secret defined by Keycloak for this application |
CALLBACK_URL |
http://localhost:3000/login |
The callback URL used by Keycloak when a challenge has succeeded. |
Securing Orion-LD - Start Up
To start the system with APISIX protecting access to Orion-LD, run the following command:
./services orion
:arrow_forward: Video : Securing A REST API
Click on the image above to see a video about securing a REST API using an API Gateway
User Logs In to the Application using the REST API
APISIX - No Access to Orion-LD without an Access Token
Secured access is ensured by requiring all requests to the secured service pass through APISIX (the gateway in front of
the Context Broker). Requests must include an Authorization: Bearer JWT; failure to present a valid token results in a
denial of access.
:one::two: Request:
If a request to APISIX is made without any access token:
curl -X GET 'http://localhost:9080/orion/ngsi-ld/v1/entities/urn:ngsi-ld:Building:farm001?options=keyValues' \
  -H 'Link: <https://fiware.github.io/tutorials.Step-by-Step/tutorials-context.jsonld>; rel="http://www.w3.org/ns/json-ld#context"; type="application/ld+json"' \
  -H 'Content-Type: application/json'
Response:
The response is a 401 Unauthorized error code:
{"message":"Missing authorization in request"}
Keycloak - User Obtains an Access Token
:one::three: Request:
To log in using the User Credentials grant, send a POST request to Keycloak using the OIDC token endpoint with
grant_type=password. For example to log in as Bob the Farm Manager:
curl -iX POST \
  'http://localhost:3005/realms/farm-management/protocol/openid-connect/token' \
  -H 'Content-Type: application/x-www-form-urlencoded' \
  --data 'username=bob&password=test&grant_type=password&client_id=ngsi-ld-farm&client_secret=1234&scope=openid+profile+email'
Response:
The response returns a JWT access_token to identify the user:
{
    "access_token": "eyJhbGciOiJSUzI1NiIsInR5cCI6IkpXVCIsImtpZCI6Ii4uLiJ9...",
    "token_type": "Bearer",
    "expires_in": 300,
    "refresh_token": "eyJhbGciOiJIUzUxMiIsInR5cCIgOiAiSldUIiwia2lkIiA6Ii4uLiJ9...",
    "scope": "openid profile email"
}
This can also be done by entering the Tutorial Application on http://localhost:3000 and logging in using any of the
OAuth2 grants on the page. A successful log-in will return an access token.
APISIX - Accessing Orion-LD with an Authorization: Bearer Token
If a request to APISIX includes a valid JWT in the Authorization: Bearer header, the request is permitted and the
Orion-LD Context Broker will return the data as expected.
:one::four: Request:
curl -X GET 'http://localhost:9080/orion/ngsi-ld/v1/entities/urn:ngsi-ld:Building:farm001?options=keyValues' \
  -H 'Link: <https://fiware.github.io/tutorials.Step-by-Step/tutorials-context.jsonld>; rel="http://www.w3.org/ns/json-ld#context"; type="application/ld+json"' \
  -H 'Content-Type: application/json' \
  -H 'Authorization: Bearer {{access_token}}'
Response:
The response returns the information regarding Farm001:
{
    "@context": "https://fiware.github.io/tutorials.Step-by-Step/tutorials-context.jsonld",
    "id": "urn:ngsi-ld:Building:farm001",
    "type": "Building",
    "category": "farm",
    "address": {
        "streetAddress": "Großer Stern 1",
        "addressRegion": "Berlin",
        "addressLocality": "Tiergarten",
        "postalCode": "10557"
    },
    "location": {
        "type": "Point",
        "coordinates": [13.3505, 52.5144]
    },
    "name": "Victory Farm",
    "owner": "urn:ngsi-ld:Person:person001"
}
:one::five: Unauthorized User Request:
A user without the farm-manager role (e.g. Mallory) will receive a 403 Forbidden from APISIX even if they present
a valid JWT, because the Keycloak UMA policy denies access:
curl -X GET 'http://localhost:9080/orion/ngsi-ld/v1/entities/urn:ngsi-ld:Building:barn002?options=keyValues' \
  -H 'Link: <https://fiware.github.io/tutorials.Step-by-Step/tutorials-context.jsonld>; rel="http://www.w3.org/ns/json-ld#context"; type="application/ld+json"' \
  -H 'Content-Type: application/json' \
  -H 'Authorization: Bearer {{mallory_access_token}}'
HTTP/1.1 403 Forbidden
Securing Orion-LD - Sample Code
When a User logs in to the application using the User Credentials Grant, an access_token JWT is obtained which
identifies the User. The access_token is stored in session:
function userCredentialGrant(req, res) {
    debug("userCredentialGrant");

    const email = req.body.email;
    const password = req.body.password;

    oa.getOAuthPasswordCredentials(email, password).then((results) => {
        req.session.access_token = results.access_token;
        return;
    });
}
For each subsequent request, the access_token is supplied in the Authorization: Bearer header:
function setAuthHeaders(req) {
    const headers = {};
    if (req.session.access_token) {
        headers["Authorization"] = "Bearer " + req.session.access_token;
    }
    return headers;
}
For example, when reading entity data, the Authorization header must be added to the request so that the User can be
identified and access granted:
async function readEntity(req, res) {
    const entity = await retrieveEntity(req.params.entityId, { options: "keyValues" }, setAuthHeaders(req));
    res.render("entity", { entity });
}
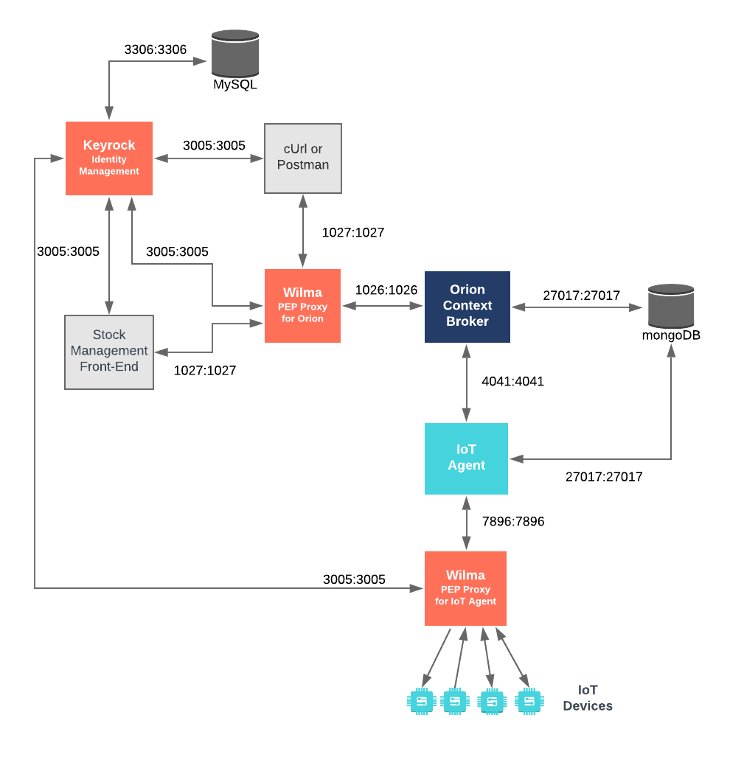
Securing an IoT Agent South Port
APISIX Configuration
To secure the South Port (device-to-IOTA communication), APISIX is configured with a route that forwards traffic to the
IoT Agent's listening port (7896). This route applies JWT validation using the openid-connect plugin, ensuring that
only devices with a valid access token can send measurements.
The relevant upstream for the IoT Agent South Port in apisix-config/apisix.yaml is:
upstreams:
    - id: 4
      nodes:
          iot-agent:7896: 1
      type: roundrobin
And the corresponding route:
routes:
    - id: 7
      uri: /iot/*
      upstream_id: 4
      plugins:
          openid-connect:
              client_id: "ngsi-ld-farm"
              client_secret: "1234"
              discovery: "http://keycloak:8080/realms/farm-management/.well-known/openid-configuration"
              realm: "farm-management"
              bearer_only: true
Devices now send their measurements to http://apisix:9080/iot/... (internally) or http://localhost:1030/iot/...
(externally).
| Key | Value | Description |
|---|---|---|
uri |
/iot/* |
The path prefix for IoT device traffic |
upstream |
iot-agent:7896 |
The IoT Agent South Port upstream |
openid-connect.bearer_only |
true |
Validate JWT only — no redirection to login |
Application Configuration
The dummy IoT sensors within the tutorial container have been updated to route their traffic through APISIX. Each
sensor must now obtain a JWT from Keycloak and include it in the Authorization: Bearer header.
tutorial-app:
    ...
    environment:
        - "IOTA_HTTP_HOST=apisix"
        - "IOTA_HTTP_PORT=9080"
        - "DUMMY_DEVICES_USER=iot_sensor_00000000-0000-0000-0000-000000000000"
        - "DUMMY_DEVICES_PASSWORD=test"
The IOTA_HTTP_HOST and IOTA_HTTP_PORT now point to the APISIX gateway instead of the IoT Agent directly.
Securing South Port Traffic - Start up
To start the system with APISIX protecting both the Context Broker and the IoT Agent South Port, run:
./services southport
IoT Sensor obtaining an Access Token
Keycloak - IoT Sensor Obtains an Access Token
Devices log in to Keycloak using the same OIDC token endpoint. For example, to log in as a sensor:
:one::five: Request:
curl -iX POST \
  'http://localhost:3005/realms/farm-management/protocol/openid-connect/token' \
  -H 'Content-Type: application/x-www-form-urlencoded' \
  --data 'username=iot_sensor_00000000-0000-0000-0000-000000000000&password=test&grant_type=password&client_id=ngsi-ld-farm&client_secret=1234'
Response:
The response returns a JWT access_token for the device:
{
    "access_token": "eyJhbGciOiJSUzI1NiIsInR5cCI6IkpXVCIsImtpZCI6Ii4uLiJ9...",
    "token_type": "Bearer",
    "expires_in": 300
}
APISIX - Accessing IoT Agent with a Bearer Token
This example simulates a secured measurement coming from the device motion001. The request is sent to APISIX with the
Authorization: Bearer header.
:one::six: Request:
curl -X POST \
  'http://localhost:1030/iot/d?k=4jggokgpepnvsb2uv4s40d59ov&i=motion001' \
  -H 'Authorization: Bearer {{access_token}}' \
  -H 'Content-Type: text/plain' \
  -d 'c|1'
Securing South Port Traffic - Sample Code
When an IoT Sensor starts up, it must log in to Keycloak to obtain a JWT:
function initSecureDevices() {
    Security.getAccessToken(process.env.DUMMY_DEVICES_USER, process.env.DUMMY_DEVICES_PASSWORD).then((token) => {
        DUMMY_DEVICE_HTTP_HEADERS["Authorization"] = "Bearer " + token;
    });
}
Each measurement request thereafter includes the Authorization header:
const options = {
    method: "POST",
    url: "http://apisix:9080/iot/d",
    qs: { k: UL_API_KEY, i: deviceId },
    headers: DUMMY_DEVICE_HTTP_HEADERS,
    body: state,
};
Securing an IoT Agent North Port
IoT Agent Configuration
The North Port (IOTA-to-Context Broker communication) is secured by requiring the IoT Agent to identify itself to the Context Broker (via APISIX) using an OAuth2 access token.
The IoT Agent is configured to obtain a token from Keycloak using the client_credentials grant.
iot-agent:
    ...
    environment:
        - IOTA_CB_HOST=apisix
        - IOTA_CB_PORT=9080
        - IOTA_AUTH_ENABLED=true
        - IOTA_AUTH_TYPE=oauth2
        - IOTA_AUTH_HEADER=Authorization
        - IOTA_AUTH_URL=http://keycloak:8080
        - IOTA_AUTH_TOKEN_PATH=/realms/farm-management/protocol/openid-connect/token
        - IOTA_AUTH_CLIENT_ID=ngsi-ld-farm
        - IOTA_AUTH_CLIENT_SECRET=1234
The IOTA_CB_HOST and IOTA_CB_PORT point to the APISIX gateway. Each request sent by the IoT Agent will include the
Authorization: Bearer header containing a valid JWT.
| Key | Value | Description |
|---|---|---|
IOTA_AUTH_ENABLED |
true |
Enable North Port security |
IOTA_AUTH_TYPE |
oauth2 |
Use OIDC/OAuth2 for authentication |
IOTA_AUTH_URL |
http://keycloak:8080 |
The Keycloak base URL |
IOTA_AUTH_TOKEN_PATH |
/realms/farm-management/protocol/openid-connect/token |
The OIDC token endpoint |
IOTA_AUTH_CLIENT_ID |
ngsi-ld-farm |
The client ID for the IoT Agent service account |
Securing an IoT Agent North Port - Start up
To start the system with APISIX protecting the communication between the IoT Agent and the Context Broker, run:
./services northport
Keycloak - Obtaining an Offline Token (Trust Token)
For certain operations, such as provisioning a trusted service group, a long-lived "offline" token (or a standard client credentials token) is required.
:one::seven: Request:
curl -iX POST \
  'http://localhost:3005/realms/farm-management/protocol/openid-connect/token' \
  -H 'Content-Type: application/x-www-form-urlencoded' \
  --data 'grant_type=client_credentials&client_id=ngsi-ld-farm&client_secret=1234'
Response:
{
    "access_token": "eyJhbGciOiJSUzI1NiIsInR5cCI6IkpXVCIsImtpZCI6Ii4uLiJ9...",
    "token_type": "Bearer",
    "expires_in": 300
}
IoT Agent - Provisioning a Trusted Service Group
The access token obtained above must be added to the trust field when provisioning the service group. This token
allows the IoT Agent to prove its identity when communicating with the Context Broker via APISIX.
:one::eight: Request:
curl -iX POST \
  'http://localhost:4041/iot/services' \
  -H 'Content-Type: application/json' \
  -H 'fiware-service: openiot' \
  -H 'fiware-servicepath: /' \
  -d '{
 "services": [
   {
     "apikey":      "4jggokgpepnvsb2uv4s40d59ov",
     "cbroker":     "http://apisix:9080/data/orion",
     "entity_type": "Motion",
     "resource":    "/iot/d",
     "trust": "{{access_token}}"
   }
 ]
}'
IoT Agent - Provisioning a Sensor
Once a trusted service group is created, devices can be provisioned normally. APISIX will validate the JWT in the
trust field (or the one automatically refreshed by the IoT Agent) before allowing the update to reach the Context
Broker.
:one::nine: Request:
curl -iX POST \
  'http://localhost:4041/iot/devices' \
  -H 'Content-Type: application/json' \
  -H 'fiware-service: openiot' \
  -H 'fiware-servicepath: /' \
  -d '{
 "devices": [
   {
     "device_id":   "motion001",
     "entity_name": "urn:ngsi-ld:Motion:001",
     "entity_type": "Motion",
     "timezone":    "Europe/Berlin",
     "attributes": [
       { "object_id": "c", "name": "count", "type": "Integer" }
     ],
     "static_attributes": [
       { "name":"refStore", "type": "Relationship", "value": "urn:ngsi-ld:Store:001"}
     ]
   }
 ]
}
'
Next Steps
Want to learn how to add more complexity to your application by adding advanced features? You can find out by reading the other NGSI-LD tutorials.
License
MIT © 2018-2024 FIWARE Foundation e.V.