

Description: This tutorial secures access to a FIWARE application using the entities created in the previous tutorial. The tutorial explains appropriate use of the various OAuth2 grant flows, and how to use the Keycloak generic enabler as an Authorization Server to identify users. Keycloak is also used as a Policy Decision Point (PDP) to restrict access.
The tutorial discusses code showing how to integrate Keycloak within a web application and demonstrates examples of Authorization Server interactions using the Keycloak GUI. Some cUrl commands are also used to access the Keycloak REST API - Postman documentation is also available.


Securing Access
"Don't let the fox guard the henhouse"
— Proverb
In order to secure access to application resources, it is necessary to know two things. Firstly, who is making the request and secondly is the requestor permitted to access the resource? The Keycloak generic enabler uses OAuth2 to enable third-party applications to obtain limited access to services. OAuth2 is the open standard for access delegation to grant access rights. It allows notifying a resource provider (e.g. the Wirecloud Generic Enabler) that the resource owner (e.g. you) grants permission to a third-party (e.g. a Wirecloud Application) access to their information (e.g. the list of entities).
There are several common OAuth 2.0 grant flows, the details of which can be found below:
The primary concept is that both Users and Applications must first identify themselves using a standard OAuth2 Challenge-Response mechanism. Thereafter, a user is assigned a token which they append to every subsequent request. This token identifies the user, the application and the rights the user is able to exercise. Keycloak can then be used with other enablers can be used to limit and lock-down access. The details of the access flows are discussed below and in subsequent tutorials.
The reasoning behind OAuth2 is that you never need to expose your own username and password to a third party to give them full access - you merely permit the relevant access which can be either Read-Only or Read-Write and such access can be defined down to a granular level. Furthermore, there is provision for revoking access at any time, leaving the resource owner in control of who can access what.
Once the application is able to authenticate users, it is also possible to lock down access using access control mechanisms. Access control requires having an access policy - in other words defining who can do what. We have already defined roles and permissions within the previous tutorial, and now need to programmatically enforce this policy by adding in a simple Policy Decision Point (PDP) – which evaluates and issues authorization decisions, and then secure access by enforcing the decision using a Policy Enforcement Point (PEP).
Standard Concepts of Identity Management
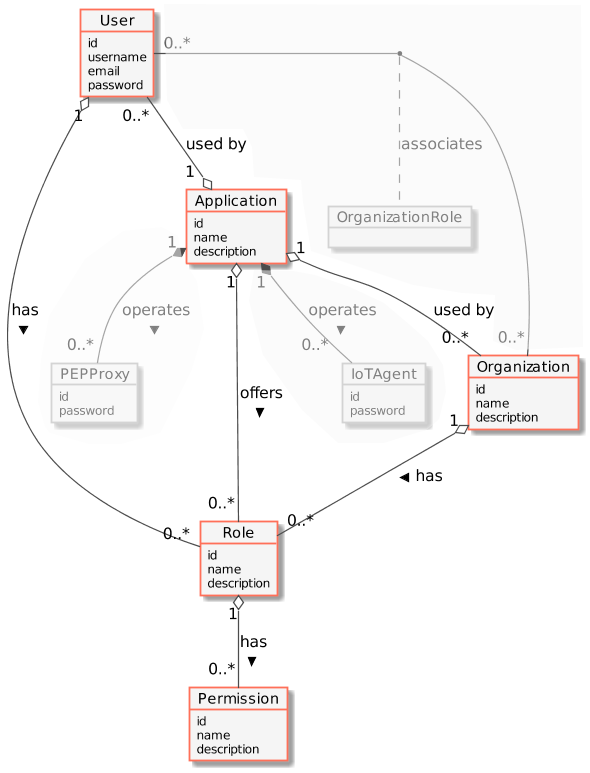
The following common objects are found with the Keycloak Identity Management database:
- User - Any signed-up user able to identify themselves with an eMail and password. Users can be assigned rights individually or as a group.
- Application - Any securable FIWARE application consisting of a series of microservices.
- Organization - A group of users who can be assigned a series of rights. Altering the rights of the organization effects the access of all users of that organization.
- OrganizationRole - Users can either be members or admins of an organization - Admins are able to add and remove users from their organization, members merely gain the roles and permissions of an organization. This allows each organization to be responsible for their members and removes the need for a super-admin to administer all rights.
- Role - A role is a descriptive bucket for a set of permissions. A role can be assigned to either a single user or an organization. A signed-in user gains all the permissions from all of their own roles plus all the roles associated to their organization.
- Permission - An ability to do something on a resource within the system.
Additionally, two further non-human application objects can be secured within a FIWARE application:
- IoTAgent - a proxy between IoT Sensors and the Context Broker.
- PEPProxy - a middleware for use between generic enablers challenging the rights of a user.
The relationship between the objects can be seen below - the entities marked in red are used directly within this tutorial:
Architecture
This application adds OAuth2-driven security into the existing Stock Management and Sensors-based application created in previous tutorials by using the data created in the first security tutorial and reading it programmatically. It will make use of three FIWARE components - the Orion-LD Context Broker, the IoT Agent for UltraLight 2.0 and integrates the use of the Keycloak Generic enabler. Usage of the Orion Context Broker is sufficient for an application to qualify as “Powered by FIWARE”.
Both the Orion Context Broker and the IoT Agent rely on open source MongoDB technology to keep persistence of the information they hold. We will also be using the dummy IoT devices created in the previous tutorial. Keycloak uses its own MySQL database.
Therefore, the overall architecture will consist of the following elements:
- The FIWARE Orion-LD Context Broker which will receive requests using NGSI-LD.
- The FIWARE IoT Agent for UltraLight 2.0 which will receive southbound requests using NGSI-v2 and convert them to UltraLight 2.0 commands for the devices.
- FIWARE Keycloak offer a complement Identity Management System
including:
- An OAuth2 authentication system for Applications and Users.
- A site graphical frontend for Identity Management Administration.
- An equivalent REST API for Identity Management via HTTP requests.
- The underlying MongoDB database :
- Used by the Orion-LD Context Broker to hold context data information such as data entities, subscriptions and registrations.
- Used by the IoT Agent to hold device information such as device URLs and Keys.
- A MySQL database :
- Used to persist user identities, applications, roles and permissions.
- The Stock Management Frontend does the following:
- Displays store information.
- Shows which products can be bought at each store.
- Allows users to "buy" products and reduce the stock count.
- Allows authorized users into restricted areas.
- A webserver acting as set of dummy IoT devices using the UltraLight 2.0 protocol running over HTTP - access to certain resources is restricted.
Since all interactions between the services are initiated by HTTP requests, the services can be containerized and run from exposed ports.
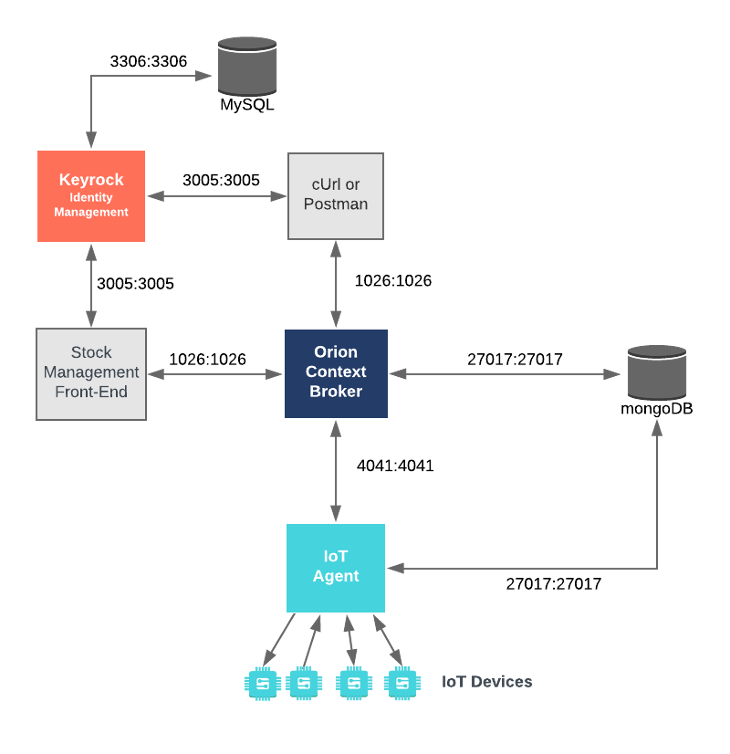
The necessary configuration information for adding security to the Stock Management Frontend can be found in the
context-provider section of the associated docker-compose.yml file - only the relevant variables are shown below:
Tutorial Security Configuration
tutorial:
    image: quay.io/fiware/tutorials.context-provider
    hostname: iot-sensors-app
    container_name: fiware-tutorial
    networks:
        default:
            ipv4_address: 172.18.1.7
    expose:
        - "3000"
        - "3001"
    ports:
        - "3000:3000"
        - "3001:3001"
    environment:
        - "DEBUG=tutorial:*"
        - "WEB_APP_PORT=3000"
        - "OIDC_ISSUER=http://keycloak:8080/realms/farm-management"
        - "OIDC_CLIENT_ID=ngsi-ld-farm"
        - "OIDC_CLIENT_SECRET=1234"
        - "OIDC_REDIRECT_URI=http://localhost:3000/login/callback"
The tutorial container is listening on two ports:
- Port
3000is exposed, so we can see the web page displaying the Dummy IoT devices. - Port
3001is exposed purely for tutorial access - so that cUrl or Postman can make UltraLight commands without being part of the same network.
The tutorial container is driven by environment variables as shown:
| Key | Value | Description |
|---|---|---|
| DEBUG | tutorial:* |
Debug flag used for logging |
| WEB_APP_PORT | 3000 |
Port used by web-app which displays the login screen & etc. |
| OIDC_ISSUER | http://keycloak:8080/realms/farm-management |
The URL of the Keycloak realm used for authentication |
| OIDC_CLIENT_ID | ngsi-ld-farm |
The Client ID defined by Keycloak for this application |
| OIDC_CLIENT_SECRET | 1234 |
The Client Secret defined by Keycloak for this application |
| OIDC_REDIRECT_URI | http://localhost:3000/login/callback |
The callback URL used by Keycloak when a challenge has succeeded. |
The other tutorial container configuration values described in the YAML file have been described in previous
tutorials.
The separate KEYCLOAK_URL and KEYCLOAK_IP_ADDRESS are only necessary because of the simplified Docker
containerization used within the tutorial. The KEYCLOAK_URL variable with the value localhost is referring to the
location externally exposed by the container, the KEYCLOAK_IP_ADDRESS variable refers to the same location but
accessed from within the Docker network. Similarly, the CALLBACK_URL contains localhost as it is assumed that the
browser will be accessed from the same machine. All of these values should be replaced with appropriate proxies and DNS
settings for a production environment, but production deployment is beyond the scope of this tutorial.
Start Up
To start the installation, do the following:
#!/bin/bash
git clone https://github.com/FIWARE/tutorials.Securing-Access.git
cd tutorials.Securing-Access
git checkout NGSI-LD

./services create
Note :
The initial creation of Docker images can take up to three minutes
Thereafter, all services can be initialized from the command-line by running the services Bash script provided within the repository:
./services start
Note :
If you want to clean up and start over again you can do so with the following command:
./services stop
Dramatis Personae
The following people at fiware.farm legitimately have accounts within the Farm Management Information System:
- Bob, the Farm Manager - he has full control over the farm and all entities.
- Carol, a Livestock Supervisor - she manages animals and related sensors (water, filling levels).
- Jenny, a Read-Only Consultant - an external auditor who can view all farm data but cannot make changes.
- Alice, the System Administrator - she manages the Keycloak instance but does not have direct access to farm data by default.
The following person at fiware.farm has signed up for an account but has no reason to be granted access:
- Mallory, the Malicious Attacker - she should be denied access to all farm resources.
1. Defined Roles & Capabilities
The following roles are defined within the farm-management realm:
| Role | Description | Access Level |
|---|---|---|
farm-manager |
Full control over the farm. | Read & Write (All Entities) |
livestock-supervisor |
Manages animals and related sensors. | Read & Write (Animal, Water, etc.) |
read-only-consultant |
External auditor/viewer. | Read Only (All Entities) |
crop-supervisor |
Manages fields and weather data. | Read & Write (Fields, Soil) |
equipment-supervisor |
Manages tractors and machinery. | Read & Write (Tractors) |
field-worker |
Worker on the ground. | Read (Domain), Write (Measurements) |
2. User Assignments (Initial Setup)
For the purpose of this tutorial, the following users have been provisioned with the credentials below (password is
always test):
| User | Group | Assigned Role | Effective Rights |
|---|---|---|---|
| Bob | farm-management |
farm-manager |
Full Read/Write access to all entities. |
| Carol | livestock-team |
None (Directly) | Access Denied (No role mapping for group) |
| Jenny | external-consultants |
None (Directly) | Access Denied (No role mapping for group) |
| Alice | None | None | Access Denied (No roles assigned) |
| Mallory | None | None | Access Denied (No roles assigned) |
Note: In the initial setup, Bob is the only user with functional access to the data because he is the only one explicitly assigned a role (
farm-manager). For Carol or Jenny to have access, their respective groups would need to be mapped to thelivestock-supervisororread-only-consultantroles within Keycloak.
One application (ngsi-ld-farm), with appropriate roles and permissions has also been created:
| Key | Value |
|---|---|
| Client ID | ngsi-ld-farm |
| Client Secret | 1234 |
| URL | http://localhost:3000 |
| RedirectURL | http://localhost:3000/login |
To save time, the data creating users and organizations from the previous tutorial has been downloaded and is automatically persisted to the MySQL database on start-up so the assigned UUIDs do not change and the data does not need to be entered again.
The Keycloak MySQL database deals with all aspects of application security including storing users, passwords etc.; defining access rights and dealing with OAuth2 authorization protocols. The complete database relationship diagram can be found here.
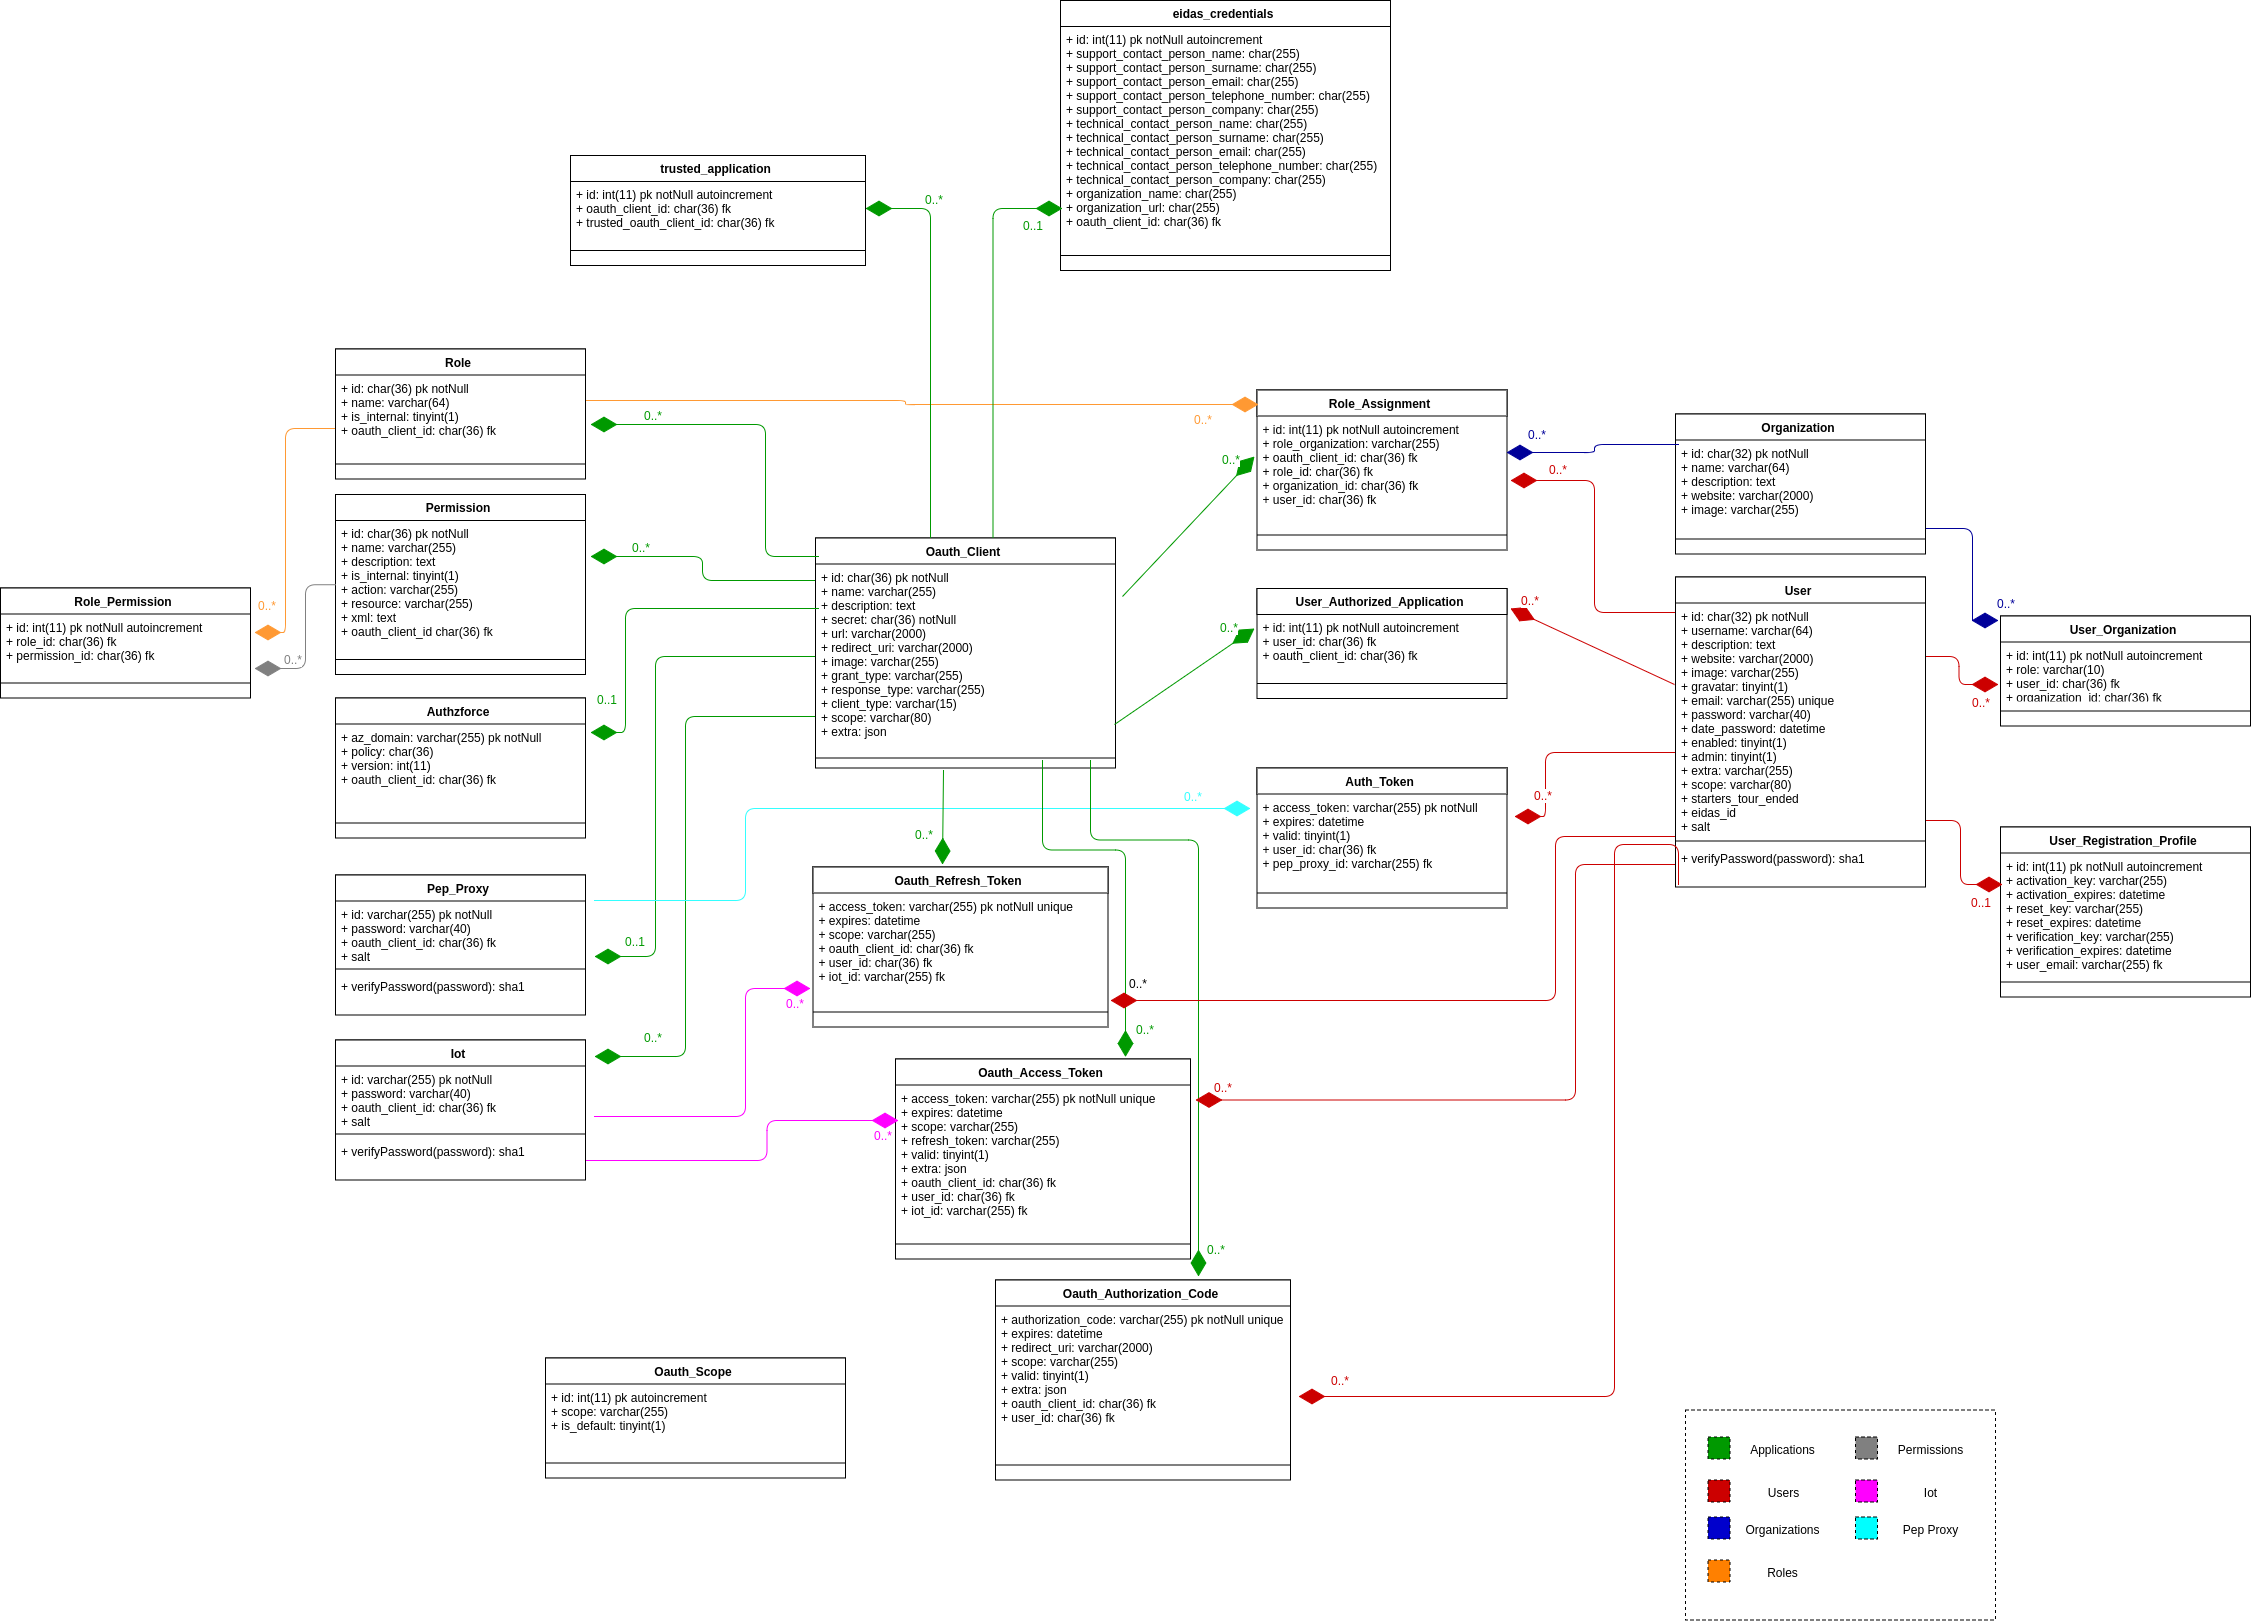
To refresh your memory about how to create users and organizations and applications, you can log in at
http://localhost:3005/idm using the account alice@fiware.farm with a password of test.
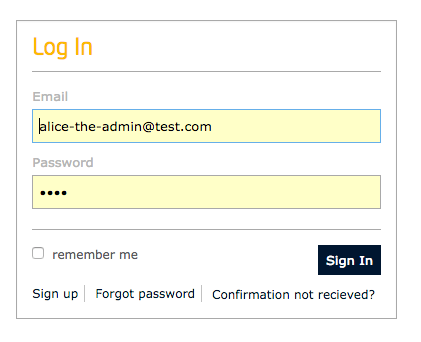
and look around.
OAuth2 Grant Flows
As noted in the documentation, Keycloak complies with the OAuth2 standard described in RFC 6749 and supports all four standard grant types defined there.
When making requests the Authorization header is built by combining the application Client ID and Client Secret
credentials provided by the Keycloak separated by a : and base-64encoded. The value can be generated as shown:
echo -n ngsi-ld-farm:1234 | base64
dHV0b3JpYWwtZGNrci1zaXRlLTAwMDAteHByZXNzd2ViYXBwOnR1dG9yaWFsLWRja3Itc2l0ZS0wMDAwLWNsaWVudHNlY3JldAo==
All four major grant flows can be demonstrated within the tutorial application, the actual flow to pick will depend on your own use case.
User Credentials Grant
The User Credentials grant flow, also known as the resource owner password credentials grant or password grant should only be used when:
- A User wants to log into an application via a web-app client.
- The web-app client is absolutely trusted.
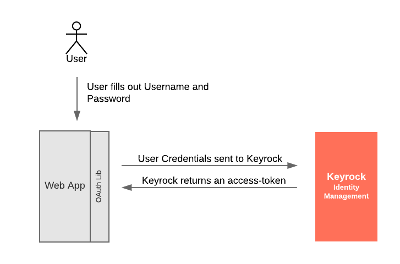
This is the most appropriate usage within the Supermarket Tutorial Application, as the Web-App has been written by us, and we can trust it to pass on credentials to an instance of Keycloak also owned by us. As you can see from the diagram, the user must type their own password into the web-app client itself.
Logging-in with a Password
1️⃣ Request
To log in using the user-credentials flow send a POST request to the oauth2/token endpoint with the
grant_type=password.
curl -iX POST \
  'http://localhost:3005/oauth2/token' \
  -H 'Accept: application/json' \
  -H 'Authorization: Basic bmdzaS1sZC1mYXJtOjEyMzQ=' \
  -H 'Content-Type: application/x-www-form-urlencoded' \
  --data "username=alice@fiware.farm&password=test&grant_type=password"
Response
Tip :
Use jq to format the JSON responses in this tutorial. Pipe the result by appending
| jq '.'
The response returns an access code to identify the user:
{
    "access_token": "a7e22dfe2bd7d883c8621b9eb50797a7f126eeab",
    "token_type": "Bearer",
    "expires_in": 3599,
    "refresh_token": "05e386edd9f95ed0e599c5004db8573e86dff874"
}
Retrieving User Details from an Access Token
The access code can then be used with a GET request to the /user endpoint to obtain user details, for example, taking
the access_token from the response above:
2️⃣ Request
curl -G -X GET \
  'http://localhost:3005/user?' \
  -d 'access_token=a7e22dfe2bd7d883c8621b9eb50797a7f126eeab' \
  -d 'ngsi-ld-farm'
Response:
The username (Alice) is returned as shown:
{
    "organizations": [],
    "displayName": "",
    "roles": [],
    "app_id": "ngsi-ld-farm",
    "trusted_apps": [],
    "isGravatarEnabled": false,
    "email": "alice@fiware.farm",
    "id": "aaaaaaaa-good-0000-0000-000000000000",
    "app_azf_domain": "",
    "username": "alice",
    "trusted_applications": []
}
User Credentials - Sample Code
The code delegates all the OAuth2 calls to a separate library
oauth2.js. Every request
includes the standard OAuth2 header and each request is wrapped in a promise to simplify the application code. The User
Credentials flow is invoked using the oa.getOAuthPasswordCredentials() function - once an access_token is received,
the user details are retrieved using a separate oa.get() call as shown:
function userCredentialGrant(req, res) {
    const email = req.body.email;
    const password = req.body.password;

    oa.getOAuthPasswordCredentials(email, password)
        .then((results) => {
            logAccessToken(req, results.access_token);
            return getUserFromAccessToken(req, results.access_token);
        })
        .then((user) => {
            // Store User and return
        });
}
function getUserFromAccessToken(req, accessToken) {
    return new Promise(function (resolve, reject) {
        oa.get(keyrockIPAddress + "/user", accessToken)
            .then((response) => {
                const user = JSON.parse(response);
                return resolve(user);
            })
            .catch((error) => {
                req.flash("error", "User not found");
                return reject(error);
            });
    });
}
User Credentials - Running the Example
It is possible to invoke the User Credentials grant flow programmatically, by bringing up the page
http://localhost:3000/ and filling out the username and password form.
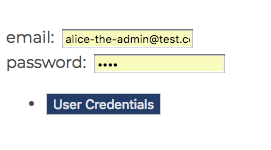
The response displays the user on the top right of the screen, details of the token are also flashed onto the screen:

Authorization Code Grant
The Authorization Code grant flow can be used where the client (in our case the Tutorial Web-application) doesn't need access to any passwords directly - it just needs to know who the user is. With the Authorization Code grant, the user is redirected to an Authorization Server such as Keycloak, logs in there and permits access. The response returns an access-code which can be exchanged for an access-token which then identifies the user.
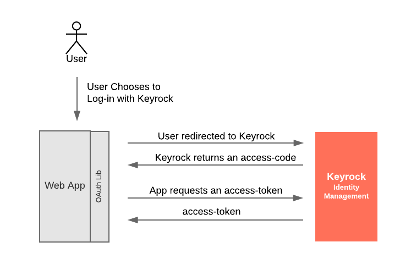
This is an example of the sort of flow used when a third party (such as Travis-CI) asks you to log in using your GitHub account. Travis never gains access to your password, but does receive details that you are who you claim to be from GitHub.
Authorization Code - Sample Code
A user must first be redirected to Keycloak, requesting a code, oa.getAuthorizeUrl() is returning a URL of the
form /oauth/authorize?response_type=code&client_id={{client-id}}&state=xyz&redirect_uri={{callback_url}}.
function authCodeGrant(req, res) {
    const path = oa.getAuthorizeUrl("code");
    return res.redirect(path);
}
The after the User authorizes access, the response is received by the redirect_uri and is handled in the code below,
an interim access code is received from Keycloak and second request must be made to obtain a usable access_token.
function authCodeGrantCallback(req, res) {
    return oa
        .getOAuthAccessToken(req.query.code)
        .then((results) => {
            return getUserFromAccessToken(req, results.access_token);
        })
        .then((user) => {
            // Store User and return
        });
}
Authorization Code - Running the Example
It is possible to invoke the User Credentials grant flow programmatically, by bringing up the page
http://localhost:3000/ and clicking on the Authorization Code Button.
The user is initially redirected to Keycloak, and must log in:
The user must then authorize the request:
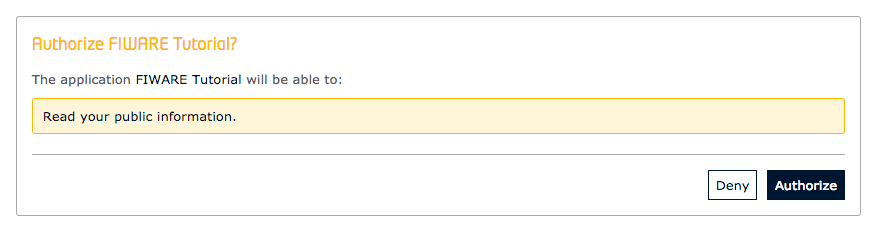
The response displays the user on the top right of the screen, details of the token are also flashed onto the screen.
Note :
Unless you deliberately log out of Keycloak >
http://localhost:3005, the existing Keycloak session which has already permitted access will be used for subsequent authorization requests, so the Keycloak login screen will not be shown again.
Implicit Grant
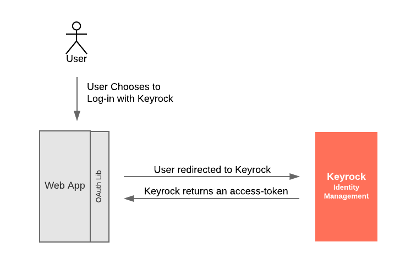
The Implicit grant flow is a simplified form of the Authorization
grant flow where Keycloak returns an access_token directly rather than returning an interim access-code. This is
less secure than the Authcode flow but can be used in some client-side applications:
Implicit Grant - Sample Code
A user must first be redirected to Keycloak, requesting a token, oa.getAuthorizeUrl() is returning a URL of the
form /oauth/authorize?response_type=token&client_id={{client-id}}&state=xyz&redirect_uri={{callback_url}}.
function implicitGrant(req, res) {
    const path = oa.getAuthorizeUrl("token");
    return res.redirect(path);
}
The after the User authorizes access, the response is received by the redirect_uri and is handled in the code below, a
usable access token is received from Keycloak:
function implicitGrantCallback(req, res) {
    return getUserFromAccessToken(req, req.query.token).then((user) => {
        // Store User and return
    });
}
Implicit Grant - Running the Example
It is possible to invoke the Implicit grant flow programmatically, by bringing up the page http://localhost:3000/ and
clicking on the Implicit Grant Button.
The user is initially redirected to Keycloak, and must log in:
The user must then authorize the request:
The response displays the user on the top right of the screen, details of the token are also flashed onto the screen.
Note :
Unless you deliberately log out of Keycloak >
http://localhost:3005, the existing Keycloak session which has already permitted access will be used for subsequent authorization request.
Client Credentials Grant
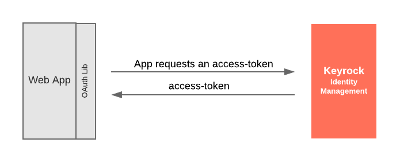
The final grant flow - the Client Credentials grant, does not need a user. It is sometimes necessary for an application to identify itself so that the application (rather than the user) is granted access to resources. There are no resources secured in such a manner within this tutorial, but the flow has been included for completeness.
Logging in as an Application
To log in using the client credentials flow send a POST request to the oauth2/token endpoint with the
grant_type=client_credentials.
3️⃣ Request:
curl -iX POST \
  'http://localhost:3005/oauth2/token' \
  -H 'Accept: application/json' \
  -H 'Authorization: Basic bmdzaS1sZC1mYXJtOjEyMzQ=' \
  -H 'Content-Type: application/x-www-form-urlencoded' \
  --data "grant_type=client_credentials"
Response:
The response returns an access code to identify the application itself.
{
    "access_token": "3816cf24b2d233546ae9244f6f6fdc327bfba69f",
    "token_type": "Bearer",
    "expires_in": 3599
}
Client Credentials Grant - Sample Code
The code is similar to the User Credential Grant, but without an explicit username or password.
function clientCredentialGrant(req, res) {
    oa.getOAuthClientCredentials().then((results) => {
        // Store Access token
    });
}
Client Credentials Grant - Running the Example
It is possible to invoke the Client Credentials grant flow programmatically, by bringing up the page
http://localhost:3000/ and clicking on the Client Credentials Button.
The response displays the details of the token. No User is involved.
Refresh Token
Once a User has identified themselves (using any appropriate grant type), they should not need to log-in again, even
though the access_token they are using is time-limited. To provide continued access, an addition
Refresh Token flow has been defined, allowing a User to exchange an
expired token for a new one. Offering this exchange is not mandatory for OAuth2 Authorization Servers, and is not
appropriate for all grant types.
Availability Check
4️⃣ Request
Check to see if Refresh Token flow is available, merely log in using one of the other grant types, for example to log in
using the user-credentials flow send a POST request to the oauth2/token endpoint with the grant_type=password.
curl -iX POST \
  'http://localhost:3005/oauth2/token' \
  -H 'Accept: application/json' \
  -H 'Authorization: Basic bmdzaS1sZC1mYXJtOjEyMzQ=' \
  -H 'Content-Type: application/x-www-form-urlencoded' \
  --data "username=alice@fiware.farm&password=test&grant_type=password"
Response
Along with the access_token identifying the user, the response returns an refresh_token:
{
    "access_token": "a7e22dfe2bd7d883c8621b9eb50797a7f126eeab",
    "token_type": "Bearer",
    "expires_in": 3599,
    "refresh_token": "05e386edd9f95ed0e599c5004db8573e86dff874"
}
Refresh Access Token
The refresh_token=05e386edd9f95ed0e599c5004db8573e86dff874 from the response above is stored for later use. To obtain
a new access_token (for example once the previous one has expired) the refresh_token is used in the OAuth2 refresh
token flow and a grant_type=refresh_token:
5️⃣ Request
curl -iX POST \
  'http://localhost:3005/oauth2/token' \
  -H 'Accept: application/json' \
  -H 'Authorization: Basic bmdzaS1sZC1mYXJtOjEyMzQ=' \
  -H 'Content-Type: application/x-www-form-urlencoded' \
  --data "refresh_token=05e386edd9f95ed0e599c5004db8573e86dff874&grant_type=refresh_token"
Response
The response is similar to the previous response, but the access_token and refresh_token have been updated and the
expiry window has been moved forward.
{
    "access_token": "298717d478980a2f0c3d2e9f9e222f1bb73e1c69",
    "token_type": "Bearer",
    "expires_in": 3599,
    "refresh_token": "4611e3ab68b5b606eb7a43db6835de646bb7d11d"
}
Refresh Token - Sample Code
The code delegates all the OAuth2 calls to a separate library
oauth2.js. Every request
includes the standard OAuth2 header and each request is wrapped in a promise to simplify the application code. The
Request Token flow is invoked using the oa.getOAuthRefreshToken() function - the previously received refresh_token
used to receive a new access_token once the previous token has expired.
function refreshTokenGrant(req, res) {
    return oa.getOAuthRefreshToken(req.session.refresh_token).then((results) => {
        // Store new Access Token
    });
}
Refresh Token - Running the Example
It is possible to invoke the Token Refresh flow programmatically, by bringing up the page http://localhost:3000/ and
filling out the username and password form.
The response displays the user on the top right of the screen, details of the token are also flashed onto the screen:
Pressing the Refresh Token button invokes returns a new access_token and refresh_token for the logged-in user.
PDP - Access Control
There are three Levels of PDP Access Control:
- Level 1: Authentication Access - Allow all actions to every signed-in user and no actions to an anonymous user.
- Level 2: Basic Authorization - Check which resources and verbs the currently logged-in user should have access to.
- Level 3: Advanced Authorization - Fine grained control through XACML.
Keycloak can be used to offer a simple Level 1 and 2 PDP on its own, and can offer level 3 combined with additional generic enablers. This tutorial will only be concerned with the logged in site itself. Securing other services in conjunction with a PEP Proxy will be dealt with in a later tutorial.
Authentication Access
If Keycloak (or any other OAuth2 provider) has successfully logged in, an access_token has been provided saying
that the user exists. This information is sufficient to authenticate a User.
Level 1 PDP can be used in conjunction with any OAuth2 provider using any flow.
If a user has authenticated using Keycloak, the freshness of the access token can be checked by making a GET request
to the /user endpoint.
6️⃣ Request
 curl -X GET \
  'http://localhost:3005/user?access_token={{access-token}}&app_id={{app-id}}'
A successful response indicates a valid access_token.
Authentication Access - Sample Code
To check that a user has logged in, just store the access_token into session when they log in, and check for its
existence:
function pdpAuthentication(req, res, next) {
    res.locals.authorized = req.session.access_token ? true : false;
    return next();
}
To check whether a Keycloak access_token has expired, you can try to retrieve the current user details on request:
function pdpAuthentication(req, res, next) {
    const keyrockUserUrl =
        keyrockIPAddress + "/user" + "?access_token=" + req.session.access_token + "&app_id=" + clientId;
    return oa
        .get(keyrockUserUrl)
        .then((response) => {
            res.locals.authorized = true;
            return next();
        })
        .catch((error) => {
            debug(error);
            res.locals.authorized = false;
            return next();
        });
}
Basic Authorization
Level 2 PDP can only be used with our own trusted instance of Keycloak, usually via the Password Grant flow.
If we are using our own trusted instance of Keycloak, once a user has signed in and obtained an access_token, the
access_token can be stored in session and used to retrieve user details on demand. The request for user details may be
extended to include resource permissions. Using this information it is possible to permit or deny access to individual
resources.
As a reminder, Keycloak permissions are based on resource (e.g. URL) and action (which can be mapped to an HTTP
verb). We can retrieve extended user details including access permissions by adding additional parameters to a /user
GET request.
7️⃣ Request
 curl -X GET \
  'http://localhost:3005/user?access_token={{access-token}}&action={{action}}&resource={{resource}}&app_id={{app-id}}'
Where :
{{access-token}}is the current access token of a logged in user e.g.6c1f1ac938f644c655b9c46c67d9f8b068345e89;{{action}}is an HTTP Verb e.g.GET;{{resource}}is a secured endpoint e.g./app/price-change;{{app-id}}.
A successful response indicates that the user is permitted to perform the action.
Basic Authorization - Sample Code
The following code makes a request to Keycloak to check the user permissions:
function pdpBasicAuthorization(req, res, next) {
    const keyrockUserUrl =
        keyrockIPAddress +
        "/user" +
        "?access_token=" +
        req.session.access_token +
        "&app_id=" +
        clientId +
        "&action=" +
        req.method +
        "&resource=" +
        req.path;
    return oa
        .get(keyrockUserUrl)
        .then((response) => {
            const user = JSON.parse(response);
            res.locals.authorized = user.authorization_decision === "Permit";
            return next();
        })
        .catch((error) => {
            debug(error);
            res.locals.authorized = false;
            return next();
        });
}
PDP Access Control - Running the Example
It is possible to invoke the PDP Access Control programmatically, by bringing up the page http://localhost:3000/ and
logging in.
Level 1: Authentication Access
Log in as eve@example.com - she has no permissions assigned to her.
The response displays the user on the top right of the screen, she is able to access the page:
Level 2: Basic Authorization
Now try to access a secured page such as http://localhost:3000/app/price-change.
Eve is denied access:

Now log in as bob-the-manager@test.com. Bob has the Management role and is permitted to change prices.
Bob is permitted access:

Next Steps
Want to learn how to add more complexity to your application by adding advanced features? You can find out by reading the other tutorials in this series.