
![]()
Background: This tutorial does not use the NGSI-LD interface directly. it covers background information about Roles and Permissions, which is then used in subsequent chapters.
Description: This tutorial explains how to register a client application within Keycloak and how to define and assign roles and permissions using the Keycloak Authorization Services. It takes the users and groups created in the previous tutorial and ensures that only legitimate users have access to NGSI-LD resources.
The tutorial demonstrates examples of interactions using the Keycloak Admin Console GUI, as well as cUrl commands used to access the Keycloak Admin REST API.

![]()
What is Authorization?
"The master's eye fattens the horse."
— Xenophon
Authorization is the process of determining whether an authenticated user has permission to perform a specific action on a specific resource. Having established who a user is (authentication), the system must now determine what that user is allowed to do (authorization).
In the context of a farm management system backed by NGSI-LD, authorization governs questions such as:
- May a livestock worker send a command to a water sprinkler?
- May an external agronomist read soil sensor data?
- May a tractor operator update a tractor entity's attributes?
Standard Concepts of Authorization in Keycloak
| Concept | Description |
|---|---|
| Realm Role | A named permission bucket at the realm level, assignable to users or groups |
| Client | A registered application that may request authentication tokens from the realm |
| Authorization Services | A Keycloak feature that defines fine-grained access control via Resources, Scopes, Policies and Permissions |
| Resource | A protected asset — in this tutorial each NGSI-LD API endpoint is a resource |
| Scope | An action that can be performed on a resource — mapped to HTTP methods (GET, POST, PATCH, DELETE) |
| Policy | A rule that evaluates whether a subject (user, group, or role) may access a resource |
| Permission | The binding of a resource and scope to one or more policies |
The relationship between these objects is shown below:
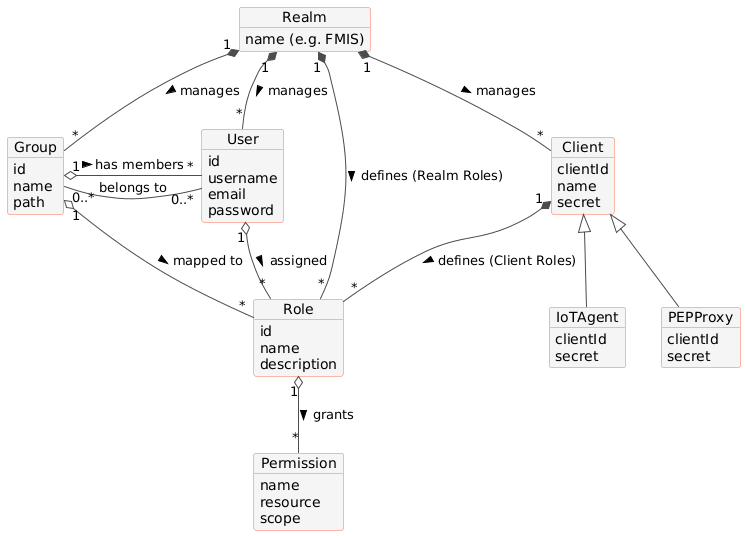
The relationship is: a Permission = Resource + Scope + Policy. A user gains access when at least one policy
evaluates to PERMIT for the resource and scope they are requesting.
Prerequisites
Docker
Follow the Docker installation instructions for your platform. Ensure Docker version 24.0 or higher and Docker Compose version 2.24 or higher are installed.
WSL
On Windows, install WSL2 and apply pending updates before starting.
Architecture
The architecture for this tutorial is identical to the Identity Management tutorial: Keycloak
backed by PostgreSQL. The realm-config/farm-management-realm.json file for this tutorial additionally defines realm
roles and a pre-registered ngsi-ld-farm client with Authorization Services enabled.
Start Up
git clone https://github.com/FIWARE/tutorials.Roles-Permissions.git
cd tutorials.Roles-Permissions
git checkout NGSI-LD

./services create
./services start
Dramatis Personae
The following people at fiware.farm legitimately have accounts within the Farm Management Information System:
- Bob, the Farm Manager - he has full control over the farm and all entities.
- Carol, a Livestock Supervisor - she manages animals and related sensors (water, filling levels).
- Jenny, a Read-Only Consultant - an external auditor who can view all farm data but cannot make changes.
- Alice, the System Administrator - she manages the Keycloak instance but does not have direct access to farm data by default.
The following person at fiware.farm has signed up for an account but has no reason to be granted access:
- Mallory, the Malicious Attacker - she should be denied access to all farm resources.
1. Defined Roles & Capabilities
The following roles are defined within the farm-management realm:
| Role | Description | Access Level |
|---|---|---|
farm-manager |
Full control over the farm. | Read & Write (All Entities) |
livestock-supervisor |
Manages animals and related sensors. | Read & Write (Animal, Water, etc.) |
read-only-consultant |
External auditor/viewer. | Read Only (All Entities) |
crop-supervisor |
Manages fields and weather data. | Read & Write (Fields, Soil) |
equipment-supervisor |
Manages tractors and machinery. | Read & Write (Tractors) |
field-worker |
Worker on the ground. | Read (Domain), Write (Measurements) |
2. User Assignments (Initial Setup)
For the purpose of this tutorial, the following users have been provisioned with the credentials below (password is
always test):
| User | Group | Assigned Role | Effective Rights |
|---|---|---|---|
| Bob | farm-management |
farm-manager |
Full Read/Write access to all entities. |
| Carol | livestock-team |
None (Directly) | Access Denied (No role mapping for group) |
| Jenny | external-consultants |
None (Directly) | Access Denied (No role mapping for group) |
| Alice | None | None | Access Denied (No roles assigned) |
| Mallory | None | None | Access Denied (No roles assigned) |
Note: In the initial setup, Bob is the only user with functional access to the data because he is the only one explicitly assigned a role (
farm-manager). For Carol or Jenny to have access, their respective groups would need to be mapped to thelivestock-supervisororread-only-consultantroles within Keycloak.
Logging In via REST API
Obtain an Admin Token
GUI
The Keycloak Admin Console can be accessed at http://localhost:3005. Log in as admin with the password 1234.
1️⃣ Request:
curl -iX POST \
  'http://localhost:3005/realms/master/protocol/openid-connect/token' \
  -H 'Content-Type: application/x-www-form-urlencoded' \
  --data-urlencode 'grant_type=password' \
  --data-urlencode 'client_id=admin-cli' \
  --data-urlencode 'username=admin' \
  --data-urlencode 'password=1234'
Response:
{
    "access_token": "eyJhbGciOiJSUzI1NiIsInR5cCIgOiAiSldUIiwia2lkIiA6ICJhZ...",
    "expires_in": 60,
    "token_type": "Bearer"
}
Store the access_token value as {{token}}.
Managing Clients
In Keycloak, a Client is the registration of an application that will request authentication tokens from the realm.
The NGSI-LD farm management proxy (ngsi-ld-farm) is pre-registered in the realm import. This section demonstrates the
CRUD operations for client management.
Client CRUD Actions
GUI
Clients are managed at Realm: farm-management → Clients.

Create a Client
2️⃣ Request:
curl -iX POST \
  'http://localhost:3005/admin/realms/farm-management/clients' \
  -H 'Authorization: Bearer {{token}}' \
  -H 'Content-Type: application/json' \
  -d '{
    "clientId": "ngsi-ld-farm",
    "name": "NGSI-LD Farm Management Application",
    "enabled": true,
    "publicClient": false,
    "secret": "1234",
    "serviceAccountsEnabled": true,
    "authorizationServicesEnabled": true,
    "redirectUris": ["http://localhost:3000/*"],
    "webOrigins": ["+"]
  }'
Response:
HTTP/1.1 201 Created
Location: http://localhost:3005/admin/realms/farm-management/clients/{{client-uuid}}
Read Client Details
3️⃣ Request:
curl -X GET \
  'http://localhost:3005/admin/realms/farm-management/clients?clientId=ngsi-ld-farm' \
  -H 'Authorization: Bearer {{token}}'
Response:
[
    {
        "id": "a1b2c3d4-e5f6-7890-abcd-ef1234567890",
        "clientId": "ngsi-ld-farm",
        "name": "NGSI-LD Farm Management Application",
        "enabled": true,
        "serviceAccountsEnabled": true,
        "authorizationServicesEnabled": true
    }
]
List all Clients
4️⃣ Request:
curl -X GET \
  'http://localhost:3005/admin/realms/farm-management/clients' \
  -H 'Authorization: Bearer {{token}}'
Update a Client
5️⃣ Request:
curl -iX PUT \
  'http://localhost:3005/admin/realms/farm-management/clients/{{client-uuid}}' \
  -H 'Authorization: Bearer {{token}}' \
  -H 'Content-Type: application/json' \
  -d '{
    "clientId": "ngsi-ld-farm",
    "name": "NGSI-LD Farm Management Application (updated)",
    "enabled": true,
    "publicClient": false,
    "serviceAccountsEnabled": true,
    "authorizationServicesEnabled": true
  }'
Delete a Client
6️⃣ Request:
curl -iX DELETE \
  'http://localhost:3005/admin/realms/farm-management/clients/{{client-uuid}}' \
  -H 'Authorization: Bearer {{token}}'
Managing Realm Roles
Realm roles are named permission buckets defined at the realm level. They can be assigned to individual users or inherited by group membership. The following roles are pre-created by the realm import:
| Role | Description |
|---|---|
farm-manager |
Full read/write access to all farm context data and commands |
livestock-supervisor |
Read/write on Animal, Water and FillingLevelSensor entities |
crop-supervisor |
Read/write on Field, SoilSensor and WeatherObserved entities |
equipment-supervisor |
Read/write on Tractor entities |
field-worker |
Write measurements, read own-domain entities |
read-only-consultant |
Read-only across all entity types |
Role CRUD Actions
GUI
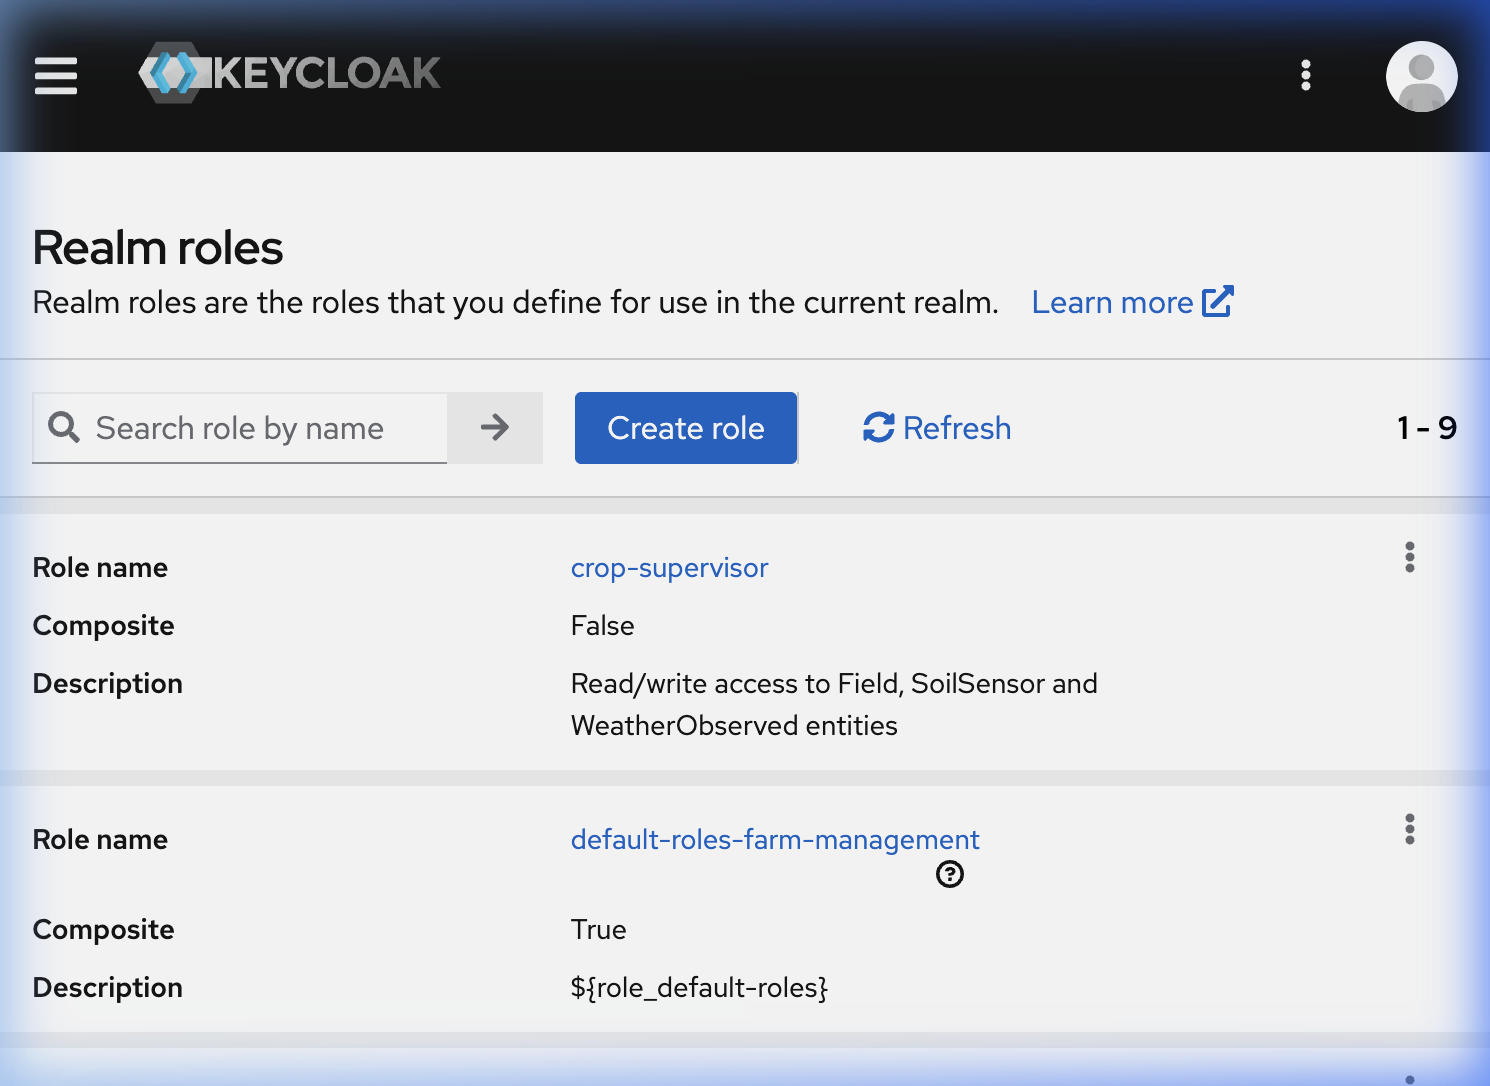
Roles are managed at Realm: farm-management → Realm roles.
Create a Role
7️⃣ Request:
curl -iX POST \
  'http://localhost:3005/admin/realms/farm-management/roles' \
  -H 'Authorization: Bearer {{token}}' \
  -H 'Content-Type: application/json' \
  -d '{
    "name": "drone-operator",
    "description": "Operate autonomous survey drones over crop fields"
  }'
Response:
HTTP/1.1 201 Created
Location: http://localhost:3005/admin/realms/farm-management/roles/drone-operator
Read Role Details
8️⃣ Request:
curl -X GET \
  'http://localhost:3005/admin/realms/farm-management/roles/farm-manager' \
  -H 'Authorization: Bearer {{token}}'
Response:
{
    "id": "b2c3d4e5-f6a7-8901-bcde-f12345678901",
    "name": "farm-manager",
    "description": "Full read/write access to all farm context data and commands",
    "composite": false,
    "clientRole": false,
    "containerId": "farm-management"
}
List all Roles
9️⃣ Request:
curl -X GET \
  'http://localhost:3005/admin/realms/farm-management/roles' \
  -H 'Authorization: Bearer {{token}}'
Update a Role
1️⃣0️⃣ Request:
curl -iX PUT \
  'http://localhost:3005/admin/realms/farm-management/roles-by-id/{{role-id}}' \
  -H 'Authorization: Bearer {{token}}' \
  -H 'Content-Type: application/json' \
  -d '{
    "name": "drone-operator",
    "description": "Operate autonomous survey drones and read telemetry data"
  }'
Delete a Role
1️⃣1️⃣ Request:
curl -iX DELETE \
  'http://localhost:3005/admin/realms/farm-management/roles-by-id/{{role-id}}' \
  -H 'Authorization: Bearer {{token}}'
Authorization Services
Keycloak's Authorization Services provides a rich framework for fine-grained access control. This section covers the four Authorization Services objects — Scopes, Resources, Policies and Permissions — and shows how they are configured for the farm management use case.
GUI
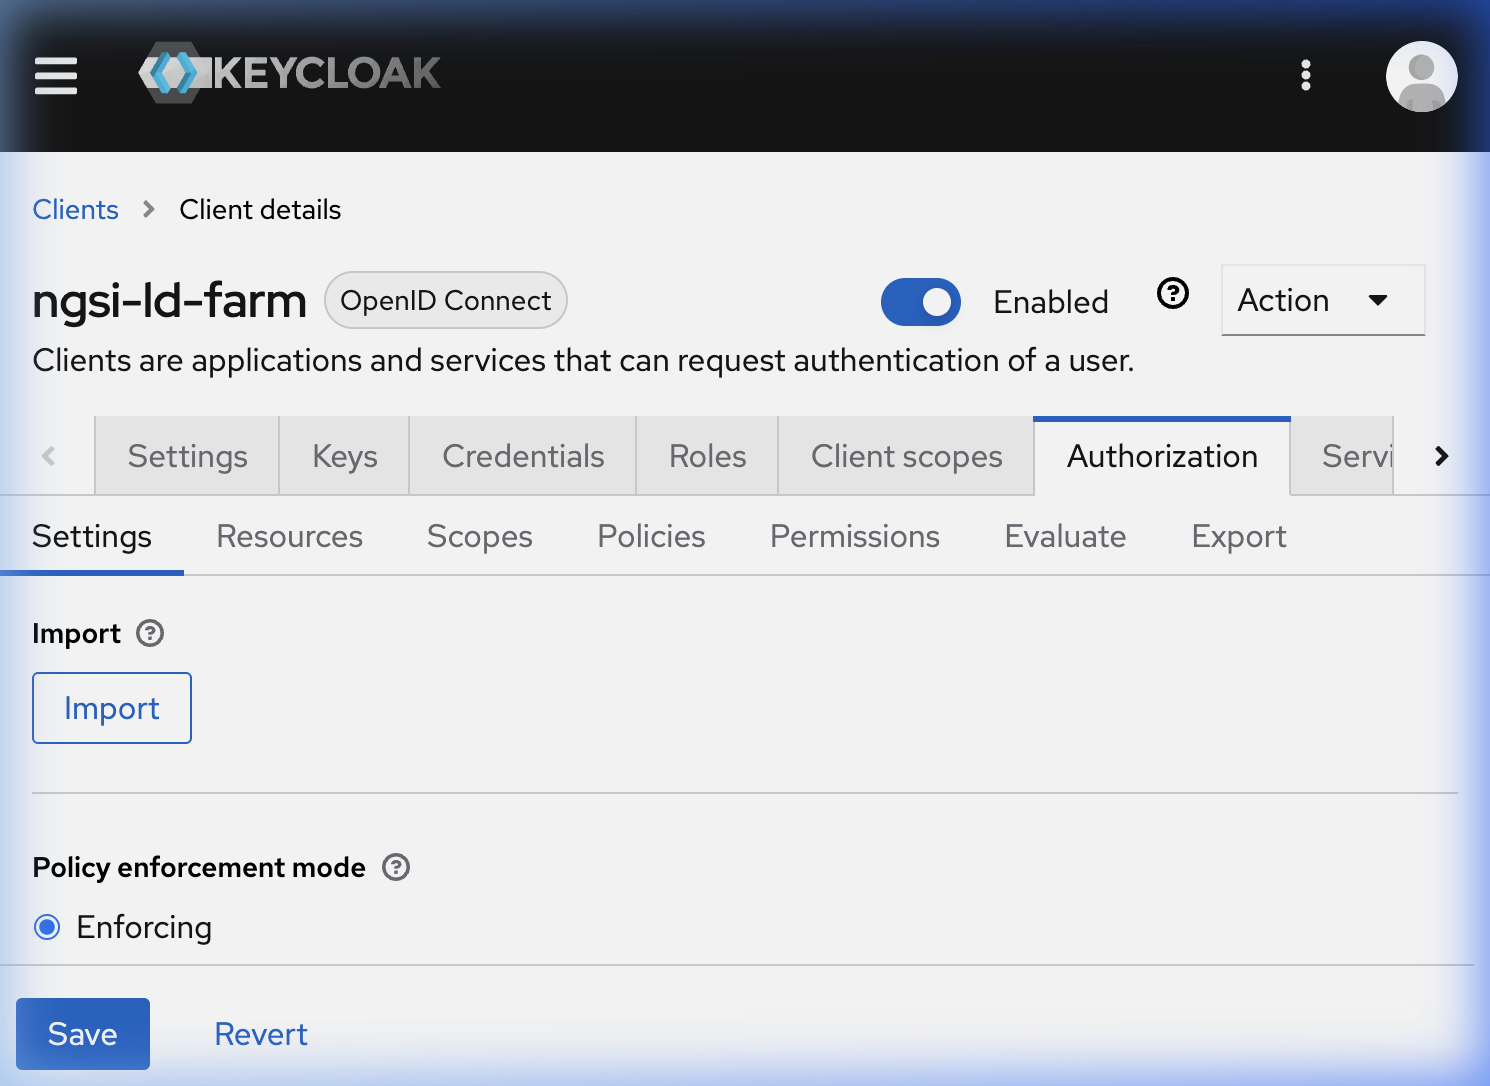
Authorization Services are configured at Clients → ngsi-ld-farm → Authorization.
All Authorization Services calls target the /admin/realms/{realm}/clients/{client-uuid}/authz/resource-server/ prefix.
Replace {{client-uuid}} with the UUID returned by the client lookup in Request 3️⃣.
Creating Scopes
Scopes represent the actions that can be performed on a protected resource. For NGSI-LD, scopes map to HTTP methods.
1️⃣2️⃣ Request:
curl -iX POST \
  'http://localhost:3005/admin/realms/farm-management/clients/{{client-uuid}}/authz/resource-server/scope' \
  -H 'Authorization: Bearer {{token}}' \
  -H 'Content-Type: application/json' \
  -d '{"name": "GET", "displayName": "HTTP GET"}'
Repeat for POST, PATCH, and DELETE.
Creating Resources
Resources represent the protected endpoints. Each resource specifies the URIs it covers and which scopes are applicable.
1️⃣3️⃣ Request:
curl -iX POST \
  'http://localhost:3005/admin/realms/farm-management/clients/{{client-uuid}}/authz/resource-server/resource' \
  -H 'Authorization: Bearer {{token}}' \
  -H 'Content-Type: application/json' \
  -d '{
    "name": "Entity Collection",
    "displayName": "NGSI-LD Entity Collection endpoint",
    "uris": ["/ngsi-ld/v1/entities", "/ngsi-ld/v1/entities/*"],
    "scopes": [{"name": "GET"}, {"name": "POST"}, {"name": "PATCH"}, {"name": "DELETE"}]
  }'
Creating Policies
Policies define the conditions under which access is granted. A role-based policy grants access when the requesting user holds a specified realm role.
1️⃣4️⃣ Request:
curl -iX POST \
  'http://localhost:3005/admin/realms/farm-management/clients/{{client-uuid}}/authz/resource-server/policy/role' \
  -H 'Authorization: Bearer {{token}}' \
  -H 'Content-Type: application/json' \
  -d '{
    "name": "Farm Manager Policy",
    "description": "Grants access to users holding the farm-manager realm role",
    "roles": [{"id": "{{farm-manager-role-id}}", "required": false}]
  }'
A group-based policy grants access to all members of a specified group:
1️⃣5️⃣ Request:
curl -iX POST \
  'http://localhost:3005/admin/realms/farm-management/clients/{{client-uuid}}/authz/resource-server/policy/group' \
  -H 'Authorization: Bearer {{token}}' \
  -H 'Content-Type: application/json' \
  -d '{
    "name": "Livestock Team Policy",
    "description": "Grants access to all members of the livestock-team group",
    "groups": [{"id": "{{livestock-team-group-id}}", "extendChildren": false}]
  }'
Creating Permissions
A Permission binds a resource and one or more scopes to one or more policies. A scope-based permission specifies which actions (scopes) on which resource are governed by which policy.
1️⃣6️⃣ Request:
curl -iX POST \
  'http://localhost:3005/admin/realms/farm-management/clients/{{client-uuid}}/authz/resource-server/permission/scope' \
  -H 'Authorization: Bearer {{token}}' \
  -H 'Content-Type: application/json' \
  -d '{
    "name": "Farm Managers can write all entities",
    "type": "scope",
    "decisionStrategy": "AFFIRMATIVE",
    "resources": ["{{entity-collection-resource-id}}"],
    "scopes": ["POST", "PATCH", "DELETE"],
    "policies": ["{{farm-manager-policy-id}}"]
  }'
The decisionStrategy of AFFIRMATIVE means access is granted if at least one of the listed policies evaluates to
PERMIT. Use UNANIMOUS to require all policies to permit.
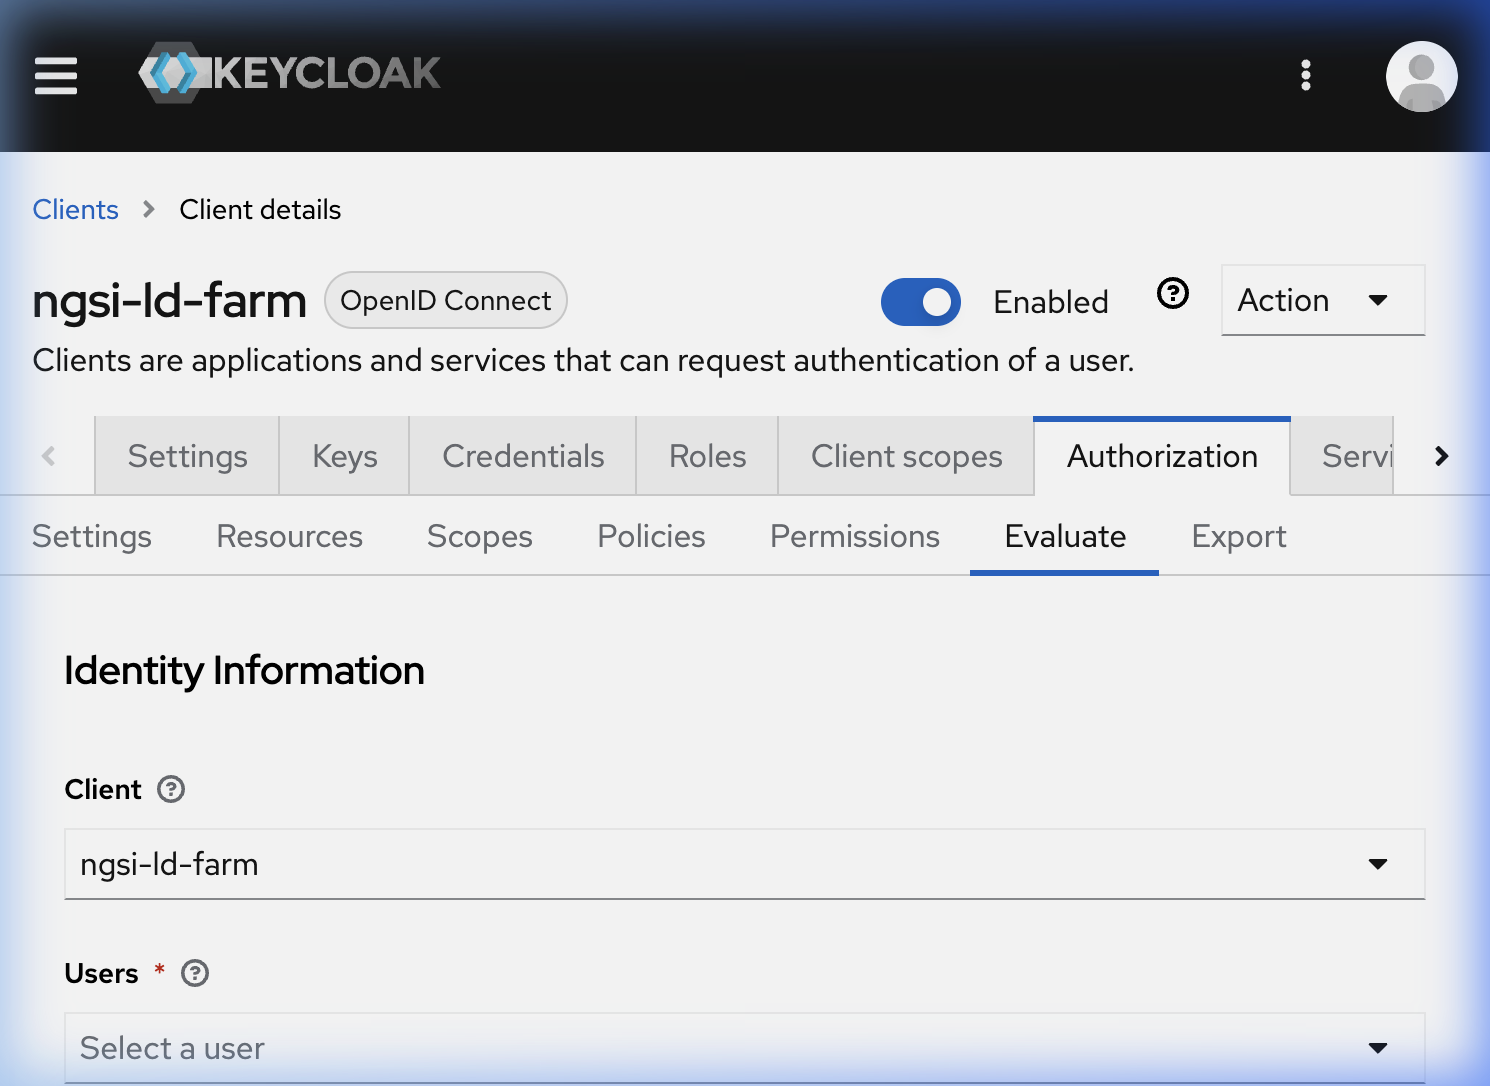
Evaluating Permissions
Keycloak provides a Policy Evaluator for testing authorization decisions before deploying a PEP Proxy. The GUI evaluator is found at Clients → ngsi-ld-farm → Authorization → Evaluate.
Via the REST API, send a UMA ticket request to obtain an RPT (Requesting Party Token) which encodes the granted permissions:
1️⃣7️⃣ Request:
curl -X POST \
  'http://localhost:3005/realms/farm-management/protocol/openid-connect/token' \
  -H 'Content-Type: application/x-www-form-urlencoded' \
  --data-urlencode 'grant_type=urn:ietf:params:oauth:grant-type:uma-ticket' \
  --data-urlencode 'client_id=ngsi-ld-farm' \
  --data-urlencode 'client_secret=1234' \
  --data-urlencode 'audience=ngsi-ld-farm' \
  --data-urlencode 'permission=Entity Collection#POST'
Response:
A 200 response with an RPT confirms the permission is granted. A 403 with access_denied confirms it is denied.
{
    "upgraded": false,
    "access_token": "eyJhbGciOiJSUzI1NiIsInR5cCIgOiAiSldUIiwia2lkIiA6...",
    "expires_in": 300,
    "token_type": "Bearer"
}
Authorizing Application Access
Authorizing Groups
Assigning a realm role to a group means all current and future members of that group inherit the role automatically.
Assign a Role to a Group
First, retrieve the role representation, then POST it to the group's role-mappings endpoint.
1️⃣8️⃣ Request:
ROLE=$(curl -s 'http://localhost:3005/admin/realms/farm-management/roles/livestock-supervisor' \
  -H 'Authorization: Bearer {{token}}')

curl -iX POST \
  'http://localhost:3005/admin/realms/farm-management/groups/{{livestock-team-group-id}}/role-mappings/realm' \
  -H 'Authorization: Bearer {{token}}' \
  -H 'Content-Type: application/json' \
  -d "[${ROLE}]"
List Roles of a Group
1️⃣9️⃣ Request:
curl -X GET \
  'http://localhost:3005/admin/realms/farm-management/groups/{{group-id}}/role-mappings/realm' \
  -H 'Authorization: Bearer {{token}}'
Response:
[
    {
        "id": "b2c3d4e5-f6a7-8901-bcde-f12345678901",
        "name": "livestock-supervisor",
        "description": "Read/write on Animal, Water and FillingLevelSensor entities",
        "composite": false,
        "clientRole": false
    }
]
Revoke a Role from a Group
2️⃣0️⃣ Request:
curl -iX DELETE \
  'http://localhost:3005/admin/realms/farm-management/groups/{{group-id}}/role-mappings/realm' \
  -H 'Authorization: Bearer {{token}}' \
  -H 'Content-Type: application/json' \
  -d "[${ROLE}]"
Authorizing Individual Users
Assign a Role to a User
2️⃣1️⃣ Request:
ROLE=$(curl -s 'http://localhost:3005/admin/realms/farm-management/roles/farm-manager' \
  -H 'Authorization: Bearer {{token}}')

curl -iX POST \
  'http://localhost:3005/admin/realms/farm-management/users/{{user-id}}/role-mappings/realm' \
  -H 'Authorization: Bearer {{token}}' \
  -H 'Content-Type: application/json' \
  -d "[${ROLE}]"
List Roles of a User
2️⃣2️⃣ Request:
curl -X GET \
  'http://localhost:3005/admin/realms/farm-management/users/{{user-id}}/role-mappings/realm' \
  -H 'Authorization: Bearer {{token}}'
Revoke a Role from a User
2️⃣3️⃣ Request:
curl -iX DELETE \
  'http://localhost:3005/admin/realms/farm-management/users/{{user-id}}/role-mappings/realm' \
  -H 'Authorization: Bearer {{token}}' \
  -H 'Content-Type: application/json' \
  -d "[${ROLE}]"
Next Steps
Want to learn how to add more complexity to your application by adding advanced features? You can find out by reading the other NGSI-LD tutorials.